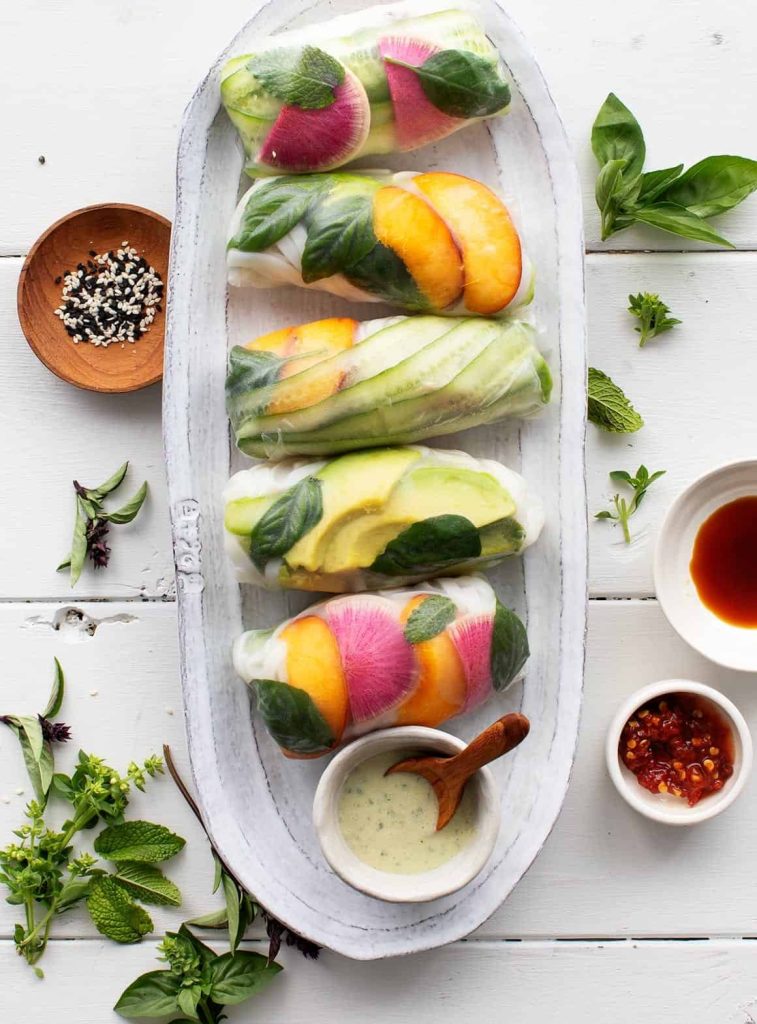
Recipes

Stuffed Bell Peppers with Quinoa and Black Beans: A Vibrant Vegan Dinner

There is something inherently appealing about a stuffed vegetable. It is a dish with visual confidence — whole, colourful, and presented with an honesty that says exactly what it is. A stuffed pepper brings the container and the meal together into a single, self-sufficient package, and that simplicity is part of its enduring charm.

These quinoa and black bean stuffed bell peppers are everything a weeknight dinner should be: uncomplicated to prepare, genuinely satisfying to eat, and versatile enough to accommodate whatever you have in the pantry. The filling is warm, spiced, and deeply flavoured. The peppers soften in the oven until they are tender and slightly caramelised. Together, they make a complete meal with very little cleanup required.

What I particularly like about this recipe is how well it scales. A single tray accommodates six large peppers, which is enough to feed a family or provide meal-prepped lunches through the week. The filling is also excellent on its own — served over rice, wrapped in a tortilla, or simply eaten from the pan with a spoon. It is one of those versatile base recipes that earns its place in any cook’s rotation.

Choosing Your Peppers

Bell peppers come in four colours at most supermarkets — green, yellow, orange, and red — and they are not interchangeable in terms of flavour. Green peppers are the least ripe and have a distinct bitterness that some find appealing and others find challenging. Red, orange, and yellow peppers are all sweeter — they have been allowed to ripen longer on the plant, converting their chlorophyll to carotenoids as they develop their colour and sweetness.

For this recipe, red and orange peppers are the most complementary to the filling’s warm spice profile. Their natural sweetness balances the cumin and chilli beautifully. Yellow peppers also work well. Green peppers are not ideal here — their bitterness can compete with rather than complement the filling.

Choose peppers that are firm, glossy, and have a flat bottom — they will sit more stably in the baking dish.

Ingredients (Serves 6)

For the filling:

  • 200g quinoa, rinsed
  • 2 cans (800g) black beans, drained and rinsed
  • 1 can (400g) chopped tomatoes
  • 1 can (200g) sweetcorn, drained
  • 1 medium onion, finely diced
  • 4 garlic cloves, minced
  • 1 jalapeño, finely diced (optional)
  • 2 teaspoons ground cumin
  • 1½ teaspoons smoked paprika
  • 1 teaspoon chilli powder
  • 1 teaspoon dried oregano
  • 2 tablespoons olive oil
  • Salt and pepper to taste
  • A large handful of fresh coriander, roughly chopped
  • Juice of 1 lime

For the peppers:

  • 6 large bell peppers (red, orange, or yellow)
  • 2 tablespoons olive oil
  • Salt and pepper

To serve:

  • Sliced avocado or guacamole
  • Vegan sour cream or cashew cream
  • Extra lime wedges and coriander
  • Hot sauce

Method

Step 1: Cook the Quinoa

Rinse the quinoa thoroughly in a fine-mesh sieve under cold running water — this removes the naturally occurring saponins on the surface that can taste bitter. Place in a saucepan with 400ml of water and a pinch of salt. Bring to a boil, reduce to a very low simmer, cover, and cook for 12 to 15 minutes until all the water has been absorbed and the quinoa is tender with small white tails visible. Remove from heat and leave covered for five minutes, then fluff with a fork.

Step 2: Prepare the Peppers

Preheat the oven to 200°C (180°C fan). Slice the tops off the peppers and remove the seeds and membranes from inside. If any peppers wobble, slice a very thin sliver from the bottom to create a stable base — be careful not to cut through to the hollow interior.

Brush the outside of the peppers lightly with olive oil, season with salt and pepper, and arrange upright in a baking dish. If the peppers lean against each other, that is perfectly fine — they will support each other during baking.

Pre-bake the empty pepper shells for 15 minutes. This head start ensures they will be fully tender by the time the filling is heated through — skipping this step often results in peppers that are still slightly firm when the filling is ready.

Step 3: Make the Filling

While the peppers pre-bake, heat olive oil in a large pan over medium heat. Add the onion and cook for 7 to 8 minutes until softened and golden. Add the garlic and jalapeño (if using) and cook for one more minute. Add the cumin, smoked paprika, chilli powder, and oregano. Stir for one minute to bloom the spices.

Add the chopped tomatoes, stir well, and simmer for 5 minutes. Add the black beans, sweetcorn, and cooked quinoa. Stir to combine and season generously with salt and pepper. Simmer for three to four minutes to allow the flavours to integrate. Remove from heat and stir in the fresh coriander and lime juice.

Step 4: Fill and Bake

Remove the pre-baked pepper shells from the oven. Spoon the filling generously into each pepper, packing it firmly and mounding it above the rim. Return to the oven and bake for a further 20 to 25 minutes, until the peppers are completely tender and beginning to char slightly at the edges.

Step 5: Serve

Allow to rest for five minutes. Serve with sliced avocado, a dollop of vegan sour cream or cashew cream, extra lime wedges, and fresh coriander.

Why Quinoa Is Worth Using Here

Quinoa has earned a somewhat polarising reputation — sometimes celebrated, sometimes mocked for its association with a certain style of wellness culture. Setting aside that baggage, it is simply a very good ingredient, and this is an ideal recipe to see why.

Quinoa is one of the rare plant foods that provides all nine essential amino acids in meaningful quantities, making it a complete protein source. It also cooks relatively quickly, has a pleasant, slightly nutty flavour, and absorbs surrounding seasonings beautifully. In this filling, it provides bulk and protein alongside the black beans, creating a genuinely satisfying and nutritionally well-rounded meal.

Each serving of two stuffed peppers provides approximately 20 grams of protein, 14 grams of fibre, and substantial amounts of vitamins A and C from the peppers themselves.

Make-Ahead and Storage

The filling can be made up to two days in advance and refrigerated in a sealed container. The pre-baked pepper shells can also be prepared a day ahead. When ready to eat, simply fill and bake as directed, adding five extra minutes of baking time if the filling is cold.

Leftover stuffed peppers store well in the refrigerator for up to three days. Reheat in a 180°C oven for 15 minutes, or microwave individual peppers for two to three minutes.

The filling freezes well — freeze in portions for up to three months and thaw overnight before using. Fully assembled and baked peppers do not freeze as successfully, as the pepper can become very soft on thawing.

Variations

Mediterranean style: Replace the cumin and chilli with dried oregano and basil. Use white beans instead of black beans, add chopped sun-dried tomatoes and kalamata olives to the filling, and finish with pine nuts and fresh basil.

Indian-spiced: Use brown rice instead of quinoa, swap black beans for chickpeas, and season the filling with garam masala, turmeric, and ginger. Serve with a drizzle of mango chutney.

Mushroom and lentil: Replace the quinoa and beans with cooked Puy lentils and finely diced sautéed mushrooms for a heartier, earthier filling.

Final Thoughts

Stuffed peppers are one of those reliable recipes that asks very little of you in terms of technique but rewards you consistently. They look impressive on the table. They travel well in lunch containers. They reheat beautifully. And they are the kind of dish that adapts gracefully to whatever your pantry offers on a given evening.

Make them once, and they will become part of your regular rotation. That is the best thing I can say about any recipe.


Find more nourishing plant-based recipes in our Website.

The Best Vegan Banana Bread You Will Ever Make (And Why It Is Actually Better Without Eggs)

Banana bread has a way of making an ordinary day feel slightly more considered. Whether it appears on a Sunday morning alongside a pot of coffee or as a midweek treat that fills the kitchen with warmth and the particular, sweet fragrance of ripe bananas baking, it is one of those recipes that asks very little but gives a great deal in return.

This vegan banana bread is moist, tender, deeply flavoured with natural banana sweetness, and has a texture that I will confidently argue is superior to many egg-based versions. The secret is the ripe — almost overripe — bananas, which provide all the binding, sweetness, and moisture that eggs and dairy typically supply in a conventional recipe.

If you have three browning bananas on your counter and an hour to spare, you have everything you need for something genuinely wonderful.

Why Overripe Bananas Are the Point

There is a window — somewhere between yellow-and-perfectly-fresh and completely black — where a banana becomes its most valuable self for baking. The skin should be deeply spotted, the flesh soft to the point of yielding at the slightest pressure, and the flavour should be intensely sweet and almost caramel-like.

This is not a salvage operation for bananas that have gone past their best. Those bananas are the best, for this purpose. As a banana ripens, its starches convert to sugars — which means overripe bananas provide more sweetness, more moisture, and a deeper, more complex flavour than their firmer counterparts. They also mash beautifully, integrating into the batter without lumps.

If your bananas are not ripe enough, place them unpeeled on a baking tray in a 160°C oven for 15 to 20 minutes. The skin will blacken and the flesh will soften and sweeten considerably.

Ingredients (Makes 1 loaf, 10–12 slices)

  • 3 very ripe bananas (approximately 300g peeled weight)
  • 200g plain flour
  • 80g rolled oats (optional, for texture — can be replaced with additional flour)
  • 150g coconut sugar or light brown sugar
  • 80ml neutral oil (sunflower, rapeseed, or melted coconut oil)
  • 60ml unsweetened oat milk or almond milk
  • 1 tablespoon apple cider vinegar
  • 1 teaspoon vanilla extract
  • 1½ teaspoons baking powder
  • ½ teaspoon bicarbonate of soda
  • ½ teaspoon ground cinnamon
  • ¼ teaspoon ground nutmeg
  • A pinch of salt
  • 80g walnuts or chocolate chips (optional, but highly recommended)

Method

Step 1: Prepare

Preheat your oven to 180°C (160°C fan). Grease a standard loaf tin (approximately 23cm × 13cm) and line with baking parchment, leaving an overhang on the long sides for easy removal.

In a small bowl or jug, combine the oat milk and apple cider vinegar. Stir briefly and set aside for five minutes — this creates a vegan buttermilk that will react with the bicarbonate of soda and help the loaf rise and tenderise.

Step 2: Mash the Bananas

Peel the bananas and mash them thoroughly in a large mixing bowl using a fork. Aim for a mostly smooth consistency with only small lumps remaining. The more thoroughly mashed they are, the more evenly they will distribute through the batter.

Step 3: Combine Wet Ingredients

To the mashed banana, add the oil, coconut sugar, vanilla extract, and the oat milk-vinegar mixture. Whisk together until well combined.

Step 4: Add Dry Ingredients

Sift the flour, baking powder, bicarbonate of soda, cinnamon, nutmeg, and salt into the wet mixture. Add the rolled oats if using. Fold gently with a spatula until just combined — a few small flour pockets are acceptable. Overmixing develops the gluten in the flour and produces a dense, tough loaf. Less mixing equals a more tender crumb.

Fold in the walnuts or chocolate chips if using.

Step 5: Bake

Pour the batter into the prepared tin and spread evenly. Slice one additional banana lengthways (if you have one) and lay it on top for a decorative finish that also adds extra banana flavour. Bake for 55 to 65 minutes, until a skewer inserted into the centre comes out clean or with only a few moist crumbs. The top should be deeply golden and set.

Step 6: Cool

Allow the loaf to cool in the tin for 15 minutes before using the parchment overhang to lift it onto a wire rack. Allow to cool for at least 30 minutes before slicing — cutting into a hot loaf causes it to compress and can result in gummy slices. The patience is worth it.

How to Tell When It Is Done

Banana bread, like most dense loaves, can appear done on the outside while remaining undercooked at the centre. The skewer test is the most reliable indicator. Insert it into the thickest part of the loaf — if it comes out with wet batter, the loaf needs more time. If it comes out with moist crumbs, the loaf is done. If it comes out completely clean, the loaf is done but should be checked for dryness.

If the top is browning too quickly before the centre is cooked, loosely tent the loaf with aluminium foil and continue baking.

Variations

Chocolate swirl: Reserve a quarter of the batter. Stir 2 tablespoons of cocoa powder into the reserved batter. Pour the plain batter into the tin, spoon the chocolate batter over the top, and use a skewer to swirl gently.

Blueberry banana: Fold 150g of fresh or frozen blueberries into the batter instead of walnuts. The blueberries burst during baking and create pockets of jammy sweetness throughout.

Tahini banana bread: Replace the neutral oil with 80g of light tahini for a sesame-flavoured loaf with a distinctive nutty depth that pairs beautifully with the banana.

Spiced version: Add a teaspoon of mixed spice and a tablespoon of dark treacle for a warming, almost gingerbread-adjacent banana loaf.

Health and Nutrition

This banana bread is a noticeably healthier option than many conventional recipes. Using coconut sugar instead of refined white sugar provides a lower glycaemic index sweetener with a richer flavour and trace minerals. Oat milk contributes beta-glucan fibre. Walnuts — if included — provide omega-3 fatty acids, vitamin E, and plant-based protein.

Bananas themselves are a meaningful source of potassium, which supports healthy blood pressure and muscle function, as well as vitamin B6, which plays a role in serotonin production. There is a reason that bananas are the instinctive choice of endurance athletes — the combination of natural sugars and potassium provides readily available, sustained energy.

This is still a baked treat rather than a health food, but it is one you can eat without conflict — made from whole, recognisable ingredients and free from dairy, eggs, and unnecessary additives.

Storage

Store the loaf wrapped tightly in beeswax wrap, cling film, or in an airtight container at room temperature for up to three days. In warm weather, refrigerate to extend shelf life to five days. Individual slices can be frozen — wrap each in parchment and place in a freezer bag. Toast directly from frozen for a particularly good result.

A Recipe Worth Sharing

Banana bread is one of those things that seems to invite generosity. It is easy to make a second loaf when you are already making one, and a loaf wrapped in parchment and tied with twine makes one of the most genuinely welcome gifts you can bring to someone’s home.

Make it for yourself on a slow morning. Make it for a friend who needs feeding. Keep it in the freezer for the evenings when you need something good without any effort.

It is always the right answer.


Find more nourishing plant-based recipes in our Website.

Roasted Butternut Squash Soup: The Vegan Bowl That Feels Like a Hug

There is a particular kind of afternoon — grey sky, cold air pressing at the windows, the day already feeling shorter than it should — where nothing matters more than a bowl of good soup. Not soup from a tin or a carton, but real soup: the kind that fills the kitchen with warmth while it is cooking, that smells like autumn itself, and that tastes like someone genuinely made it for you.

This roasted butternut squash soup is that soup. It is velvet-smooth, naturally sweet, subtly spiced, and finished with a swirl of coconut cream that adds a richness without heaviness. Roasting the squash before blending is the step that separates a good squash soup from a great one — it concentrates the sugars, caramelises the edges, and develops a depth of flavour that boiling simply cannot replicate.

This is also one of the most forgiving recipes you can make. The squash is difficult to overcook. The blending step is straightforward. And the final result is so consistently excellent that it has become my most-made soup of the autumn and winter seasons, and one of the first recipes I share when someone tells me they are curious about cooking more plant-based food.

Why Roasting Makes the Difference

When you boil butternut squash, the water draws flavour out of the vegetable into the cooking liquid. Some of that ends up in the soup, but much of the natural sugars and flavour compounds are diluted. When you roast it, the opposite happens: the moisture evaporates, the sugars concentrate and caramelise at the cut surfaces, and the squash develops a complexity that intensifies further when blended.

The same principle applies to the garlic and onion in this recipe. Roasting them alongside the squash — rather than softening them separately on the stovetop — gives the soup a mellow, slightly sweet base that is markedly different from the sharper flavour of raw-sautéed alliums.

If you have an extra twenty minutes, roast everything together. The soup will be better for it.

Ingredients (Serves 4–6)

  • 1 large butternut squash (approximately 1.2kg), peeled, seeded, and diced into 3cm chunks
  • 1 large onion, quartered
  • 6 garlic cloves, unpeeled
  • 3 tablespoons olive oil
  • 1 litre vegetable stock (good quality, ideally homemade or low-sodium)
  • 1 can (400ml) coconut milk or coconut cream
  • 2 teaspoons ground ginger
  • 1 teaspoon ground cumin
  • ½ teaspoon smoked paprika
  • ¼ teaspoon ground nutmeg
  • ¼ teaspoon ground cinnamon
  • Salt and black pepper to taste
  • 1 tablespoon apple cider vinegar or fresh lemon juice (to brighten)

To serve:

  • Coconut cream, swirled
  • Toasted pumpkin seeds
  • Chilli flakes or fresh red chilli
  • Fresh thyme or flat-leaf parsley
  • Crusty sourdough bread

Method

Step 1: Roast the Vegetables

Preheat your oven to 200°C (180°C fan). Arrange the diced squash and quartered onion on a large, lined baking tray. Scatter the unpeeled garlic cloves over the top. Drizzle generously with olive oil and season with salt and pepper. Toss everything to coat, then spread into a single layer.

Roast for 35 to 40 minutes, turning the squash once halfway through, until the squash is completely tender and beginning to caramelise at the edges, and the onion is golden and softened. The garlic cloves should feel completely soft when pressed. Remove from the oven.

Step 2: Prepare for Blending

Allow the roasted vegetables to cool for 5 minutes. Squeeze the roasted garlic from its skins directly into your blender or soup pot, discarding the papery husks. Transfer the squash and onion as well.

Step 3: Add the Spices and Blend

Add the ground ginger, cumin, smoked paprika, nutmeg, and cinnamon to the blender along with half the vegetable stock. Blend until completely smooth. If using an immersion blender, transfer everything to a large pot and blend directly in the pot. Work in batches if necessary to avoid overfilling a standard blender.

Step 4: Finish the Soup

Pour the blended soup into a large saucepan over medium heat. Add the remaining vegetable stock and the coconut milk, stirring to combine. Adjust the consistency with additional stock if the soup is thicker than you prefer. Simmer gently for 10 minutes to allow the spices to mellow and the flavours to integrate.

Add the apple cider vinegar or lemon juice — this small addition lifts the entire soup, cutting through the sweetness of the squash and the richness of the coconut. Taste carefully and adjust the salt, pepper, and spice levels.

Step 5: Serve

Ladle into warmed bowls. Add a swirl of coconut cream, a small handful of toasted pumpkin seeds, a pinch of chilli flakes, and fresh herbs. Serve immediately with crusty bread for dipping.

Warming Spice Combinations to Explore

The spice blend in this recipe is warming and gently exotic without being overwhelming. But there are several excellent variations worth exploring once you have made the base recipe:

Thai-inspired: Replace the spice blend with 2 tablespoons of red Thai curry paste and add a stalk of lemongrass to the roasting tray. Remove before blending.

Moroccan style: Use ras el hanout in place of the individual spices, and add a tablespoon of harissa to the finished soup for heat and complexity.

Classic autumn: Omit the ginger and cumin, increase the cinnamon and nutmeg, and finish with a drizzle of good maple syrup and a sprig of fresh sage fried crispy in butter.

Each variation produces a distinctly different soup while maintaining the same essential sweetness and silkiness of the base.

Nutrition and Wellness

Butternut squash is among the most nutrient-dense winter vegetables available. It is exceptionally rich in beta-carotene — the precursor to vitamin A — with a single cup providing well over the daily recommended intake. Vitamin A supports immune function, skin cell turnover, and eye health, making squash an especially valuable ingredient in the colder months when immune resilience is a priority.

The squash also provides meaningful amounts of vitamin C, potassium, magnesium, and dietary fibre. Coconut milk contributes medium-chain triglycerides — a form of saturated fat that is metabolised differently from long-chain fats and has been associated with improved energy metabolism in some research contexts.

Pumpkin seeds, used here as a garnish, are a concentrated source of zinc, magnesium, and plant-based omega-3 fatty acids. Even a small handful on top of each bowl adds genuine nutritional value alongside texture.

Storage and Meal Prep

This soup keeps well and is ideal for batch cooking. Refrigerate in sealed containers for up to five days. It thickens considerably on refrigeration — simply add a small amount of water or stock when reheating and stir to restore the original consistency.

To freeze, allow the soup to cool completely and portion into freezer-safe containers. Leave a small amount of headspace to allow for expansion. Freeze for up to four months. Thaw overnight in the refrigerator and reheat gently, stirring frequently to prevent the coconut milk from separating.

This soup also packs well in a thermos for work lunches or outdoor activities. Keep the toppings in a separate small container and add at the moment of serving.

Final Thoughts

A great soup is one of the simplest proofs that cooking well is not about complexity — it is about understanding your ingredients and giving them what they need. Butternut squash needs heat to become its best self. Spices need a moment to bloom. Acid needs to be added at the end to preserve its brightness.

Give this recipe those small attentions, and it will reward you with a bowl of soup that is genuinely, unreservedly excellent. Make a large pot. Share it if you can. Keep the rest for the days when you need it most.


Find more nourishing plant-based recipes in our Website.

Vegan Pad Thai: Authentic Street-Food Flavour at Home

The first time I had truly great pad thai, it was from a street cart in Bangkok, eaten standing up with a plastic fork at ten in the morning, and it changed my understanding of what noodles could be. The balance of flavours was extraordinary — salty, sweet, sour, umami, and the kind of smoky fragrance that comes only from a wok over intense, direct heat.

Recreating that experience at home comes with one honest caveat: your kitchen stove is unlikely to reach the temperatures of a commercial gas burner or street food wok. But that does not mean you cannot make excellent pad thai at home. With the right ingredients, the right technique, and a willingness to cook in small batches over the highest heat your stove can offer, you can produce a dish that captures the essence of the original in a way that is deeply satisfying.

This version is fully plant-based, using tofu as the protein and tamarind paste at the heart of the sauce — because tamarind is not optional in pad thai. It is what gives the dish its characteristic sour-sweet depth that differentiates it from every other noodle dish. If you have not cooked with tamarind before, this recipe is the best possible introduction to it.

The Non-Negotiables of Pad Thai

Before the recipe itself, a brief note on what you absolutely should not compromise on:

Tamarind paste: This is the soul of the sauce. Ketchup is sometimes suggested as a substitute in Western adaptations. It is not a substitute. It is a different dish. Tamarind paste is widely available in Asian grocery stores and most large supermarkets.

Fish sauce alternative: Traditional pad thai uses fish sauce. For a fully vegan version, use a combination of soy sauce and a small amount of seaweed flakes (or nori) to approximate the oceanic depth. There are also dedicated vegan fish sauce products available.

Flat rice noodles: Vermicelli noodles will work in a pinch, but the flat, wide rice noodles — typically labelled as “rice stick noodles” — give the dish its characteristic texture and absorb the sauce more effectively.

Cook in batches: Do not double the recipe and cook it all at once in a single pan. Overcrowded woks steam rather than fry. Cook two servings at a time for the best result.

Ingredients (Serves 4)

For the sauce:

  • 3 tablespoons tamarind paste
  • 3 tablespoons soy sauce or tamari
  • 1 tablespoon vegan fish sauce (or 1 tablespoon soy + ½ teaspoon nori flakes)
  • 2 tablespoons coconut sugar or brown sugar
  • 1 tablespoon rice vinegar

For the noodles and protein:

  • 300g flat rice noodles
  • 400g firm tofu, pressed and cubed
  • 3 tablespoons neutral oil (divided)
  • 2 tablespoons cornstarch (for the tofu)
  • 4 garlic cloves, thinly sliced
  • 4 spring onions, white and green parts separated
  • 150g bean sprouts
  • 2 tablespoons soy sauce (for marinating tofu)

To serve:

  • 4 tablespoons roasted peanuts, roughly crushed
  • 2 limes, cut into wedges
  • Fresh coriander
  • Dried chilli flakes
  • Extra bean sprouts

Method

Step 1: Soak the Noodles

Soak the flat rice noodles in cold water for 30 minutes, or in warm water for 15 minutes, until pliable but not fully cooked — they should be flexible but still have significant resistance when you bite one. Drain and set aside. They will finish cooking in the wok.

Step 2: Make the Sauce

Combine the tamarind paste, soy sauce, vegan fish sauce, coconut sugar, and rice vinegar in a small bowl. Whisk until the sugar has dissolved. Taste and adjust — it should be a bold combination of salty, sour, and sweet. Set aside within reach of the stove.

Step 3: Prepare the Tofu

Press the tofu firmly between clean tea towels for at least 20 minutes. Cut into 1.5cm cubes. Toss with 2 tablespoons of soy sauce, then coat in cornstarch. Heat 1.5 tablespoons of neutral oil in a wide pan or wok over high heat. Add the tofu in a single layer and cook without moving for 3 to 4 minutes until deeply golden. Turn and cook for another 2 to 3 minutes until crisp on all sides. Remove and set aside.

Step 4: Cook the Pad Thai (in batches)

Heat the remaining oil in the wok over the highest possible heat. Add half the garlic and the white parts of the spring onions. Stir-fry for 30 seconds. Add half the drained noodles and half the sauce. Toss continuously using tongs for 2 to 3 minutes — the noodles should absorb the sauce and develop some caramelisation on the edges where they contact the hot pan. Add half the tofu and half the bean sprouts. Toss for one more minute. Remove to a serving plate and cook the second batch.

Step 5: Serve

Pile the pad thai onto plates and top with crushed peanuts, fresh coriander, the green parts of the spring onions, and a wedge of lime. Serve chilli flakes on the side for those who want extra heat.

Pressing Tofu: Why It Matters

The difference between soft, spongy tofu and crispy, golden tofu is almost entirely about moisture removal. Tofu is sold packed in water, and that water must be removed before the tofu can brown properly. Even ten minutes of pressing between weighted tea towels makes a significant difference. Thirty minutes is better. If you have a tofu press, use it — they are inexpensive and genuinely useful.

Once pressed, the cornstarch coating creates a thin, crispy crust that holds up to the sauce without becoming soggy. Do not skip it.

The Wok Technique

Professional pad thai is cooked with a technique called “wok hei” — a Cantonese term that translates roughly as “breath of the wok.” It refers to the complex, slightly smoky flavour that high-heat cooking imparts. You cannot fully replicate wok hei on a home stove, but you can get close by ensuring your wok or pan is ripping hot before anything goes in, cooking in small batches to maintain temperature, and working quickly with confidence.

A carbon steel wok is worth the investment if you cook stir-fries regularly. It heats faster and retains heat better than most non-stick pans, and it will last a lifetime with proper care.

Nutritional Profile

Tofu is among the most complete plant-based proteins available, containing all nine essential amino acids in meaningful quantities. A 100g serving provides approximately 8 grams of protein, along with calcium, iron, and manganese. Combined with the energy from the rice noodles and the micronutrients from the fresh vegetables, this is a nutritionally balanced meal that genuinely satisfies.

Peanuts add healthy monounsaturated fats, additional protein, and a meaningful amount of niacin and folate. Bean sprouts contribute vitamin C and a satisfying crunch.

Final Thoughts

Pad thai done well is one of the most exciting things you can cook in a home kitchen. It is fast, intensely flavoured, and rewards confidence. Once you have made it two or three times and found your rhythm with the sauce and the heat, it becomes a dish you can pull together faster than takeaway can be delivered.

Make the sauce in advance. Press the tofu the night before. Have everything ready at the stove. Then cook it fast, eat it immediately, and enjoy every bite.


Browse more vibrant plant-based recipes in our Website.

Vegan Shepherd’s Pie: The Ultimate Plant-Based Comfort Food

Few dishes carry the emotional weight of a shepherd’s pie. It is the kind of food that shows up at the table in winter, when the windows are fogged and the daylight is short, and it asks very little of you except that you sit down and eat. It is generous, warming, and deeply comforting — a meal that seems to understand what you need before you do.

This vegan version honours that spirit completely. The filling is built on lentils, mushrooms, and root vegetables slow-cooked in a rich, herbaceous gravy that is every bit as satisfying as the traditional lamb-based original. The topping is a cloud of creamy, golden mashed potato that blankets the filling and crisps beautifully in the oven. Together, they create a dish that I genuinely believe most people would struggle to identify as entirely plant-based.

The key to this recipe is the lentil and mushroom combination. Lentils provide body, protein, and a satisfying earthiness. Finely diced mushrooms — particularly if you allow them to cook down properly — take on an almost meaty texture and release a depth of umami flavour that forms the backbone of the filling. This is not a dish that imitates meat; it is a dish that builds its own compelling case.

Ingredients (Serves 6)

For the filling:

  • 250g green or brown lentils, rinsed (or 2 cans cooked lentils, drained)
  • 400g chestnut or portobello mushrooms, very finely diced
  • 2 medium carrots, diced into small cubes
  • 2 stalks celery, diced
  • 1 medium onion, finely diced
  • 4 garlic cloves, minced
  • 150g frozen peas
  • 2 tablespoons tomato paste
  • 2 tablespoons soy sauce
  • 1 tablespoon Worcestershire sauce (vegan version)
  • 250ml red wine or additional vegetable stock
  • 400ml vegetable stock
  • 2 tablespoons plain flour
  • 1 tablespoon fresh rosemary, finely chopped
  • 1 tablespoon fresh thyme leaves
  • 2 tablespoons olive oil
  • Salt and black pepper

For the mashed potato topping:

  • 1.2kg floury potatoes (Maris Piper or King Edward), peeled and quartered
  • 4 tablespoons vegan butter
  • 100ml unsweetened oat milk or plant milk of choice
  • 1 teaspoon Dijon mustard
  • Salt, white pepper, and a pinch of nutmeg

Method

Step 1: Cook the Lentils (if using dried)

If using dried lentils, place them in a saucepan with plenty of cold water. Bring to a boil and simmer for 20 to 25 minutes until tender but holding their shape. Drain and set aside. If using canned lentils, drain and rinse them and proceed directly to the filling.

Step 2: Build the Filling

Heat the olive oil in a large, deep pan or casserole over medium heat. Add the onion, carrots, and celery with a pinch of salt. Cook for 10 minutes, stirring occasionally, until softened. Add the garlic and cook for one more minute.

Turn the heat to high, add the diced mushrooms, and cook without stirring for two to three minutes to allow them to brown. They will release a lot of liquid — continue cooking, stirring occasionally, until this liquid has evaporated and the mushrooms are deeply golden. This step is essential for developing the meaty depth of the filling.

Reduce the heat to medium. Add the tomato paste and cook for two minutes, stirring. Sprinkle over the flour and stir well to coat everything — this will thicken the gravy. Add the red wine (or extra stock) and let it bubble for two minutes, then add the vegetable stock, soy sauce, Worcestershire sauce, rosemary, and thyme. Stir well.

Add the cooked lentils and stir to combine. Simmer over low heat for 15 to 20 minutes until the gravy is thick and rich. Add the frozen peas in the final two minutes of cooking. Taste and season generously with salt and black pepper.

Step 3: Make the Mashed Potato

While the filling simmers, cook the potatoes in a large pan of well-salted boiling water for 15 to 20 minutes until completely tender. Drain thoroughly, then return to the pan over low heat for one minute to steam off excess moisture — this step produces a fluffier mash.

Remove from heat. Mash until completely smooth. Add the vegan butter, plant milk, Dijon mustard, salt, white pepper, and a pinch of nutmeg. Beat with a wooden spoon until light and creamy. The mash should be rich and smooth — add more plant milk if needed to reach the right consistency.

Step 4: Assemble and Bake

Preheat your oven to 200°C (180°C fan). Transfer the filling to a large baking dish — approximately 30cm × 22cm — and spread it evenly. Spoon the mashed potato over the top, spreading it gently to cover the filling completely. Use a fork to create a ridged pattern across the surface — these ridges will catch the heat and crisp up beautifully in the oven.

Bake for 25 to 30 minutes until the mash is golden in places and the filling is visibly bubbling at the edges.

Step 5: Rest and Serve

Allow to rest for 5 to 10 minutes before serving — the filling will settle and become easier to portion. Serve with steamed green beans, tenderstem broccoli, or a simple green salad.

Why This Works Nutritionally

This dish is a nutritional complete meal in a single baking dish. Lentils are one of the most impressive sources of plant-based nutrition: a single cup provides around 18 grams of protein, 16 grams of dietary fibre, and substantial amounts of iron, folate, and potassium. They are also one of the most affordable sources of protein available, making this a dish that nourishes without straining a budget.

Carrots provide beta-carotene, celery contributes anti-inflammatory compounds, and mushrooms bring vitamin D and B vitamins to the mix. The potato topping, while primarily a source of comfort, also provides meaningful amounts of potassium and vitamin C — particularly when the skins are left on and the potatoes are cooked gently.

Storage and Freezing

This shepherd’s pie stores beautifully. Cover and refrigerate for up to four days, reheating portions in the oven at 180°C for 20 minutes or in the microwave. It also freezes exceptionally well — either as a whole assembled dish before or after baking, or in individual portions. Freeze for up to three months and thaw overnight in the refrigerator before reheating.

For best results when reheating from frozen, cover the dish with foil and bake at 180°C for 35 to 40 minutes, removing the foil for the final 10 minutes to re-crisp the topping.

Variations

Root vegetable topping: Replace half the potato with celeriac or parsnip for a more complex, slightly sweet topping that pairs particularly well with the herby filling.

Add red wine: If you have a bottle open, a generous splash of red wine added after the mushrooms caramelise adds a wonderful depth to the gravy. Let it reduce by half before adding the stock.

Sweeten the filling: A tablespoon of balsamic vinegar stirred through the filling at the end adds a gentle sweetness and extra complexity to the gravy.

Final Thoughts

There is a reason dishes like shepherd’s pie endure across generations and cultures: they are built on the principle of substance. They are designed to nourish, to warm, and to be genuinely enjoyed. This plant-based version does not diminish that purpose in any way — it carries it forward, with different ingredients and the same intention.

Make it for a cold evening. Make it for someone who thinks they do not like vegan food. Make it because you want something that will feed you well today and even better tomorrow.

It will do all of those things, and do them well.


Explore more warming plant-based recipes in our Website

Thai Peanut Noodles: The 20-Minute Vegan Dinner That Tastes Like Takeaway

Some recipes exist to remind you that eating well does not have to be complicated. These Thai peanut noodles are perhaps the best example I know of that truth. They come together in under twenty minutes, require minimal equipment, and produce a bowl of food so rich, so balanced, and so quietly addictive that I have made them more times than I can reasonably count.

The peanut sauce is the centrepiece. It is bold without being heavy, sweet without being cloying, and carries just enough heat to keep you reaching for the next mouthful. Tossed through rice noodles and piled with crisp, fresh vegetables, it is the kind of dish that proves vegan food at its best is not a substitute for anything — it is simply excellent cooking in its own right.

This recipe is also almost infinitely adaptable. Whatever vegetables you have in your refrigerator — bell peppers, broccoli, edamame, cucumber, shredded carrot — they all belong here. The sauce is the constant; everything else is a variable.

The Anatomy of a Great Peanut Sauce

A great peanut sauce has five elements in balance: fat, salt, acid, sweetness, and heat. Peanut butter provides the fat and, together with soy sauce, the salt. Fresh lime juice delivers the acid. Maple syrup or coconut sugar brings the sweetness. Fresh chilli or chilli flakes provide the heat. Garlic and ginger thread through the whole thing, giving it depth and fragrance.

The ratio matters, but so does your palate — and that is why tasting as you go is not optional here, it is the recipe. Start with the proportions below, then adjust. A touch more lime if it needs brightness. A little more soy if it feels flat. An extra teaspoon of chilli if you want more fire. The sauce should taste almost too intense on its own, because once tossed through noodles and vegetables, it mellows significantly.

One more thing: use warm water to thin the sauce rather than cold. Warm water blends more easily into the peanut butter and prevents the sauce from seizing up.

Ingredients (Serves 4)

For the peanut sauce:

  • 5 tablespoons natural peanut butter (smooth or crunchy)
  • 3 tablespoons soy sauce or tamari
  • 2 tablespoons fresh lime juice
  • 1½ tablespoons maple syrup or coconut sugar
  • 1 tablespoon rice vinegar
  • 2 teaspoons sesame oil
  • 3 garlic cloves, finely minced or grated
  • 1 tablespoon fresh ginger, grated
  • 1 to 2 teaspoons chilli flakes or sambal oelek (to taste)
  • 4 to 6 tablespoons warm water (to loosen)

For the noodles and vegetables:

  • 300g rice noodles (flat or vermicelli)
  • 1 red bell pepper, thinly sliced
  • 2 medium carrots, julienned or grated
  • 1 cucumber, halved and thinly sliced
  • 150g edamame beans (shelled, thawed if frozen)
  • 4 spring onions, thinly sliced
  • A large handful of fresh coriander
  • A large handful of fresh mint
  • 2 tablespoons sesame seeds, toasted

Optional toppings:

  • Crushed roasted peanuts
  • Extra lime wedges
  • Crispy tofu or tempeh
  • Thinly sliced red chilli

Method

Step 1: Make the Peanut Sauce

Combine the peanut butter, soy sauce, lime juice, maple syrup, rice vinegar, sesame oil, garlic, ginger, and chilli flakes in a medium bowl. Whisk together until smooth — it will look thick and slightly seized at first, but keep whisking. Add warm water, one tablespoon at a time, until you reach a pourable, coating consistency. Taste and adjust any element you feel is out of balance. Set aside.

Step 2: Cook the Noodles

Cook the rice noodles according to the packet instructions — most flat rice noodles require soaking in boiling water for 5 to 8 minutes rather than active boiling. Once tender, drain and rinse under cold water to stop the cooking and prevent sticking. If the noodles are very long, you can snip them roughly with kitchen scissors for easier tossing.

Step 3: Prepare the Vegetables

While the noodles soak, prepare all your vegetables. This is a raw-vegetable dish, so everything is sliced or grated for maximum freshness. The crunch of the carrot and bell pepper against the tender noodles and creamy sauce is part of what makes this dish so appealing.

Step 4: Combine

Place the drained noodles in a large bowl. Pour over most of the peanut sauce and toss well to coat every strand. Add the carrots, bell pepper, edamame, spring onions, coriander, and mint. Toss again gently, adding more sauce if needed. The noodles absorb the sauce quickly, so be generous.

Step 5: Serve

Divide between bowls and garnish with toasted sesame seeds, crushed peanuts, fresh lime wedges, and any additional toppings. Serve immediately, or refrigerate and serve cold as a noodle salad — it works beautifully both ways.

Making it a Full Meal: Adding Protein

The noodles as described are a satisfying meal for most people, but if you want to add more protein, crispy tofu is the natural companion.

To make crispy tofu: press a block of firm tofu between clean tea towels for at least 20 minutes to remove excess moisture. Cut into cubes, toss in a little soy sauce and cornstarch, and pan-fry in a tablespoon of neutral oil over high heat until golden and crisp on all sides. Add directly to the bowl.

Tempeh, marinated and pan-fried, is another excellent option. Its firmer, slightly nutty character pairs especially well with the intensity of the peanut sauce.

Health Benefits Worth Noting

Despite tasting like an indulgence, this dish is nutritionally well-rounded. Natural peanut butter provides protein, healthy monounsaturated fats, vitamin E, and magnesium. The raw vegetables contribute a range of vitamins, antioxidants, and dietary fibre. Fresh herbs — particularly coriander — provide meaningful amounts of vitamin K and trace minerals.

Rice noodles are naturally gluten-free and easy to digest, making this a dish that is accessible to those with gluten sensitivities. Use tamari instead of standard soy sauce to ensure the dish is fully gluten-free.

The sesame oil, beyond flavour, provides lignans and healthy polyunsaturated fats. It is one of those ingredients that earns its place nutritionally as well as flavourwise.

Storage

The peanut sauce can be made several days in advance and stored in a sealed jar in the refrigerator, where it will keep for up to a week. The assembled noodles are best eaten on the day they are made, as the noodles continue to absorb the sauce and can become clumped if stored overnight. If making ahead, store the sauce, noodles, and vegetables separately and combine just before serving.

A Recipe for All Occasions

What I appreciate most about this recipe is that it requires no special occasion. It belongs equally at a dinner party — served in a large bowl in the centre of the table for people to help themselves — and on a Tuesday evening when you open the refrigerator, see a wilting bell pepper and some leftover noodles, and decide something good can still come from what is there.

That versatility, more than anything else, is what makes this a staple recipe. It adapts to you, to your kitchen, and to whatever happens to be in your vegetable drawer. And it always tastes like someone tried.


Discover more quick and delicious plant-based meals in our Website

Sweet Potato and Black Bean Enchiladas: A Vegan Comfort Food Worth Making Every Week

There are certain meals that achieve something rare — they are simultaneously easy enough for a busy Wednesday evening and impressive enough to serve to guests on a weekend. These sweet potato and black bean enchiladas fall squarely into that category. They are saucy, slightly smoky, generously filled, and topped with a homemade red enchilada sauce that genuinely makes the dish.

I want to be honest about something: the enchilada sauce makes or breaks this recipe. Tinned enchilada sauce is perfectly serviceable, and on a time-pressed evening it is a completely reasonable shortcut. But the homemade version — which takes only fifteen minutes and uses ingredients most kitchens already stock — elevates the dish from good to genuinely memorable. I have included both options below, and you can make your own judgment.

What draws me back to this recipe regularly is how well it reheats. Make a tray on Sunday evening, and you have effortless lunches through the week. The flavours deepen overnight, the filling becomes even more tender, and the sauce settles into the tortillas in a way that is deeply satisfying. It is the kind of cooking that rewards you twice.

On the Filling

Sweet potato and black beans are a partnership built on complementary strengths. Sweet potato brings natural sweetness, a creamy texture, and a vibrant orange colour that makes the filling visually appealing. Black beans contribute earthy, robust protein and a firmness that prevents the filling from becoming stodgy. Together, seasoned with cumin, chilli, and smoked paprika, they create a filling that is layered, complex, and anything but one-dimensional.

The key to the best filling is roasting the sweet potato rather than boiling it. Roasting concentrates its natural sugars, adds caramelised edges, and gives the filling a textural interest that boiled sweet potato simply cannot match. It takes a little longer, but the difference is worth it.

Ingredients (Serves 4–6, approximately 10 enchiladas)

For the filling:

  • 2 medium sweet potatoes, peeled and diced into 1cm cubes
  • 2 cans (800g) black beans, drained and rinsed
  • 1 medium onion, finely diced
  • 3 garlic cloves, minced
  • 1 can (200g) sweetcorn, drained
  • 1 red bell pepper, diced
  • 2 teaspoons ground cumin
  • 1½ teaspoons smoked paprika
  • 1 teaspoon chilli powder
  • Salt and pepper to taste
  • 2 tablespoons olive oil
  • A handful of fresh coriander

For the homemade enchilada sauce:

  • 1 can (400g) chopped tomatoes
  • 2 tablespoons tomato paste
  • 2 teaspoons ground cumin
  • 1½ teaspoons smoked paprika
  • 1 teaspoon chilli powder
  • 1 teaspoon garlic powder
  • 1 teaspoon onion powder
  • 1 tablespoon olive oil
  • 200ml vegetable stock
  • Salt to taste

To assemble:

  • 10 medium flour tortillas
  • Vegan cheese, grated (optional)
  • Sliced avocado, lime, and coriander to serve

Method

Step 1: Roast the Sweet Potato

Preheat your oven to 200°C (180°C fan). Toss the diced sweet potato with one tablespoon of olive oil, a pinch of cumin, salt, and pepper. Spread in a single layer on a lined baking tray. Roast for 25 minutes until tender and lightly caramelised at the edges. Remove from the oven and set aside. Keep the oven on.

Step 2: Make the Enchilada Sauce

While the sweet potato roasts, heat the olive oil in a saucepan over medium heat. Add the tomato paste and cook for two minutes, stirring, to caramelise it slightly. Add the spices — cumin, smoked paprika, chilli powder, garlic powder, onion powder — and stir for one minute. Add the chopped tomatoes and vegetable stock. Simmer for 10 minutes, stirring occasionally, until the sauce has thickened and the flavours have come together. Taste and adjust seasoning. Blend briefly with an immersion blender for a smoother consistency, if preferred.

Step 3: Cook the Filling

Heat the remaining tablespoon of oil in a large pan over medium heat. Add the onion and cook for 6 to 7 minutes until softened. Add the garlic, red pepper, cumin, smoked paprika, and chilli powder. Cook for two more minutes. Add the black beans and sweetcorn. Stir to combine and season generously. Fold in the roasted sweet potato gently, keeping some pieces intact for texture. Add the fresh coriander.

Step 4: Assemble

Spread a thin layer of enchilada sauce across the bottom of a large baking dish. Warm the tortillas briefly in a dry pan or microwave — this makes them more pliable and less likely to crack when rolled. Place a generous spoonful of filling along the centre of each tortilla, roll firmly, and place seam-side down in the dish. Repeat until all filling and tortillas are used.

Pour the remaining enchilada sauce over the top, spreading it to cover the tortillas completely. Sprinkle with grated vegan cheese if using.

Step 5: Bake

Bake in the preheated oven for 20 to 25 minutes until the sauce is bubbling and the tops are lightly golden. Allow to rest for five minutes before serving.

Step 6: Serve

Serve straight from the dish, topped with sliced avocado, a squeeze of lime, and fresh coriander. A simple shredded lettuce salad alongside cuts through the richness beautifully.

Nutritional Information

This dish is a nutritional powerhouse in the most unassuming way. Sweet potatoes are rich in beta-carotene — the precursor to vitamin A — which supports immune function and skin health. They are also a good source of vitamin C, potassium, and dietary fibre. Black beans provide approximately 15 grams of protein and 15 grams of fibre per cup, making them one of the most valuable ingredients in plant-based cooking.

Together, this meal provides a substantial amount of complex carbohydrates for sustained energy, plant-based protein for muscle maintenance, and micronutrients that support overall health. It is the kind of meal you feel as good eating as you feel making it.

Storage and Meal Prep

These enchiladas store exceptionally well. Cover the baking dish tightly with foil and refrigerate for up to four days. Reheat individual portions in the microwave or return the entire dish to a 180°C oven for 15 minutes. Add a small splash of water before reheating to loosen the sauce if needed.

To freeze, assemble the enchiladas completely, including the sauce, but do not bake. Cover tightly with foil and freeze for up to three months. Bake from frozen at 180°C for 40 to 45 minutes, or thaw overnight in the refrigerator and bake for the usual 20 to 25 minutes.

Variations

Add greens: A large handful of spinach or finely chopped kale stirred into the filling at the last moment adds colour and nutrition without changing the flavour profile significantly.

Make it spicier: Add one or two finely diced chipotle peppers in adobo sauce to the enchilada sauce for a deeper, smokier heat.

Use corn tortillas: For a more traditional preparation and a naturally gluten-free version, use corn tortillas instead of flour. Warm them well before rolling to prevent cracking, and work quickly.

Add cashew cream: A drizzle of blended cashew cream over the finished enchiladas adds a luxurious richness and makes the dish feel especially indulgent.

Final Thoughts

What this recipe does well — and what I think sets it apart from a lot of plant-based cooking — is that it does not ask you to pretend. It does not try to be meat. It is simply a deeply flavourful, genuinely satisfying dish built on the merits of its own ingredients. The sweet potato is there because it belongs. The black beans are there because they work. The sauce ties everything together because someone took fifteen minutes to make it properly.

That is cooking at its most honest, and it is the kind of cooking that always tastes best.


Try more hearty plant-based dinner recipes in our website

The Secret to a Perfect Vegan Mushroom Risotto (That Nobody Will Believe Is Dairy-Free)

Risotto has a reputation for being difficult. Chefs on cooking competitions treat it with an almost reverent caution, and home cooks often sidestep it entirely, assuming it requires either technical skill they do not have or constant, anxious supervision. I want to challenge both of those assumptions — because risotto, at its core, is simply a technique of patience and attention, and once you understand what you are trying to achieve, it becomes one of the most enjoyable things to cook.

This vegan mushroom risotto is rich, deeply savoury, and so satisfying that it has become the dish I make when I want to genuinely impress someone. The secret is layering umami — through a combination of dried porcini mushrooms, fresh mixed mushrooms, good vegetable stock, and a generous finish of nutritional yeast that gives the dish that characteristic savoury depth typically associated with Parmesan.

You do not need dairy to make a great risotto. You need good stock, the right rice, and enough time to stir.

A Note on the Rice

Risotto rice is not interchangeable with regular long-grain rice. The dish depends on the starch released from short-grain varieties — specifically Arborio, Carnaroli, or Vialone Nano — to create that creamy, flowing consistency. Arborio is the most widely available and works beautifully. Do not rinse the rice before cooking; the surface starch is precisely what you want to preserve.

Carnaroli, if you can find it, is worth seeking out. It is slightly firmer, releases starch more gradually, and gives you a longer window between perfect risotto and overcooked. It is the variety most used by Italian chefs for good reason.

The Role of Dried Mushrooms

Dried porcini mushrooms are one of the most underrated ingredients in a home kitchen. When soaked in hot water, they release a deeply flavoured, almost meaty liquid that works as a ready-made umami base. In this recipe, that soaking liquid is added directly to the stock, infusing every ladle with concentrated mushroom flavour.

Do not skip this ingredient. It is inexpensive, keeps for months in a sealed jar, and elevates the final dish in a way that fresh mushrooms alone simply cannot replicate.

Ingredients (Serves 4)

  • 300g Arborio or Carnaroli rice
  • 500g mixed fresh mushrooms (chestnut, portobello, shiitake — any combination)
  • 25g dried porcini mushrooms
  • 1.2 litres good-quality vegetable stock, kept warm
  • 1 medium onion, very finely diced
  • 4 garlic cloves, minced
  • 150ml dry white wine (or an additional 150ml stock)
  • 3 tablespoons olive oil
  • 2 tablespoons vegan butter
  • 4 tablespoons nutritional yeast
  • 1 tablespoon fresh thyme leaves (or 1 teaspoon dried)
  • 1 tablespoon soy sauce
  • Salt and black pepper to taste
  • Fresh flat-leaf parsley, to serve
  • Truffle oil, to serve (optional but excellent)

Method

Step 1: Rehydrate the Porcini

Place the dried porcini mushrooms in a heatproof bowl and pour over 300ml of boiling water. Leave to soak for at least 20 minutes. Once soaked, remove the mushrooms, squeezing out any excess liquid, and chop them roughly. Pour the soaking liquid through a fine sieve or muslin cloth into your warm vegetable stock — this becomes the flavoured base for your risotto. Discard any grit left behind.

Step 2: Cook the Fresh Mushrooms

Heat one tablespoon of olive oil in a wide pan over high heat. Add the fresh mushrooms and cook without stirring for two to three minutes — you want them to develop colour rather than steam. Season with salt and pepper, add the soy sauce, and toss briefly. Remove from the pan and set aside. High heat and patience are the keys to golden rather than grey mushrooms.

Step 3: Begin the Risotto

In a wide, heavy-bottomed pan, heat the remaining two tablespoons of olive oil over medium heat. Add the onion and a pinch of salt. Cook gently for 8 to 10 minutes until soft and translucent. Add the garlic and thyme and cook for one more minute. Add the rehydrated porcini mushrooms and stir to combine.

Step 4: Toast the Rice

Add the rice to the pan and stir constantly for two minutes until each grain is well coated in the oil and begins to turn slightly translucent at the edges. This toasting step is important — it helps the rice maintain structure through the long cooking process.

Step 5: Add the Wine

Pour in the white wine and stir constantly until it has been almost entirely absorbed. The alcohol will evaporate quickly, leaving behind a pleasant acidity that balances the richness of the final dish.

Step 6: Add the Stock, Ladle by Ladle

This is the step that defines risotto. Add the warm stock one ladleful at a time, stirring frequently and waiting until each addition is almost completely absorbed before adding the next. This gradual process coaxes the starch from the rice, building the creamy consistency that characterises a great risotto. The entire process takes around 18 to 20 minutes over medium heat. Taste the rice as you go — it should be tender with just a slight bite at the centre when done.

Step 7: Finish and Serve

Remove the pan from heat. Stir in the vegan butter and nutritional yeast vigorously — this technique, called mantecatura in Italian cooking, is what gives risotto its final glossy, creamy texture. Fold in the reserved sautéed mushrooms. Taste and season generously with salt and pepper.

Serve immediately in warm bowls, finished with fresh parsley and a small drizzle of truffle oil if using.

Nutritional Highlights

Mushrooms are among the most nutritionally interesting ingredients in plant-based cooking. They are one of the few non-animal sources of vitamin D, particularly when exposed to sunlight — and shiitake mushrooms are a valuable source of B vitamins and zinc. Combined with the protein from nutritional yeast and the complex carbohydrates from the rice, this dish offers a balanced and genuinely nourishing meal.

Nutritional yeast deserves particular mention. Beyond its savoury, almost cheesy flavour, it is a complete protein and often fortified with vitamin B12 — a nutrient of particular importance for those following a fully plant-based diet. Two tablespoons provides a meaningful contribution to daily requirements.

Serving Suggestions

This risotto is complete as a standalone dish but pairs well with a simple green salad dressed with lemon and olive oil. A glass of the same dry white wine used in cooking is the natural accompaniment.

For a special occasion, shave thin slices of fresh black truffle over the top — it transforms the dish into something genuinely extraordinary. A small drizzle of good truffle oil achieves a similar effect at a fraction of the cost.

Make-Ahead Tips

Risotto is best served immediately, but if you are cooking for a dinner party and want to manage your time, you can cook the risotto to about 75 percent done — around 14 minutes of stock addition — and then spread it out on a baking tray to cool and halt the cooking. When ready to serve, reheat in the pan with an additional ladle or two of warm stock and finish as directed. This technique is widely used in restaurant kitchens and works extremely well.

Leftover risotto makes outstanding risotto cakes the following day. Form cold risotto into patties, coat lightly in breadcrumbs, and pan-fry in a little oil until golden on both sides. They are arguably even better than the original.

Final Thoughts

What this recipe ultimately asks of you is presence — a willingness to stand at the stove, stir, observe, and adjust. In an era of multitasking and distraction, there is something genuinely therapeutic about a dish that demands your full attention for twenty minutes. The risotto becomes better for your focus, and so, in some small way, do you.

Make it on a quiet evening when you have time to enjoy the process. It will reward you.


Explore more comforting plant-based recipes in our Website.

Creamy Chickpea Tikka Masala: A Plant-Based Twist on a Beloved Classic

There are some dishes that feel like a warm embrace — the kind of meal that makes you slow down, take a breath, and remember that cooking can be one of the most grounding things a person does. Tikka masala is one of those dishes for me. Rich, fragrant, deeply spiced, and finished with a sauce that you will want to mop up with everything in reach, it has long been a favourite in households across the world.

This version swaps the traditional chicken for chickpeas — not as a compromise, but as a genuine upgrade. Chickpeas carry spice beautifully. They have a natural earthiness that pairs wonderfully with the tomato-based sauce, and their firm texture means they hold up through the simmering process without turning to mush. The result is a bowl of food that is satisfying in every sense of the word.

What I love most about this recipe is that it is genuinely achievable on a weeknight. If you keep a few key spices in your pantry and most home cooks do the shopping list is short and the active cooking time is under forty minutes. Yet the flavour suggests something far more laboured. That is the beauty of spices used well.

Understanding the Flavour Base

Before we get into the recipe itself, it is worth talking briefly about what makes a tikka masala sauce taste the way it does because understanding the flavour logic makes you a better cook, not just a better recipe-follower.

The foundation is a deeply cooked onion and tomato base. When you take the time to cook the onions low and slow until they are genuinely golden not merely translucent you develop a natural sweetness and depth that no amount of seasoning can replicate. This step is the most important in the recipe, and it is also the one most people rush. Give it time.

From there, the spice blend does the work. Cumin, coriander, garam masala, turmeric, and smoked paprika come together to create that unmistakable warmth. A generous amount of ginger and garlic rounds out the aromatics. The final touch a swirl of coconut cream softens the edges of the sauce and gives it that distinctive, velvety finish.

Ingredients (Serves 4)

  • 2 cans (800g) chickpeas, drained and rinsed
  • 1 can (400g) chopped tomatoes
  • 1 can (400ml) coconut cream
  • 2 medium onions, finely diced
  • 6 garlic cloves, minced
  • 2 tablespoons fresh ginger, grated
  • 3 tablespoons tomato paste
  • 2 tablespoons neutral oil (such as sunflower or coconut)
  • 1½ teaspoons cumin seeds
  • 1½ teaspoons ground coriander
  • 1 teaspoon turmeric
  • 1 teaspoon smoked paprika
  • 1½ teaspoons garam masala
  • 1 teaspoon chilli powder (adjust to taste)
  • 1½ teaspoons salt, or to taste
  • 1 teaspoon sugar (optional, to balance acidity)
  • Fresh coriander, to serve
  • Basmati rice or naan bread, to serve

Method

Step 1: Build the Base

Heat the oil in a wide, heavy-bottomed pan over medium heat. Add the cumin seeds and let them sizzle for about thirty seconds — you will know they are ready when they begin to pop and release their aroma. Add the diced onions and a pinch of salt. Cook over medium-low heat for 12 to 15 minutes, stirring occasionally, until the onions are deeply golden and beginning to caramelise. This patience is rewarded later in the depth of the sauce.

Step 2: Add Aromatics and Spices

Stir in the garlic and ginger and cook for two minutes. Add the tomato paste and cook for another two minutes, stirring constantly — this brief caramelisation of the paste removes its raw edge and adds another layer of flavour. Now add the ground coriander, turmeric, smoked paprika, and chilli powder. Stir everything together and cook for one minute, letting the spices bloom in the residual oil.

Step 3: Build the Sauce

Pour in the chopped tomatoes and stir well, scraping any caramelised bits from the bottom of the pan. Simmer for 10 minutes, allowing the tomatoes to break down and the sauce to reduce. If you prefer a smoother sauce, use an immersion blender at this point to partially blend it — leaving some texture is perfectly fine too.

Step 4: Add the Chickpeas and Coconut Cream

Add the drained chickpeas and stir to coat them in the sauce. Pour in the coconut cream, reduce the heat to low, and simmer gently for 15 minutes. The sauce will thicken and deepen in colour. Add the garam masala and taste for salt. If the sauce tastes sharp or overly acidic, a small pinch of sugar will balance it beautifully.

Step 5: Rest and Serve

Remove from heat and allow the dish to rest for five minutes before serving. This brief resting time allows the flavours to settle. Serve over fluffy basmati rice or alongside warm naan bread, and finish with a generous handful of fresh coriander.

Why This Works for the Whole Family

One of the most common hesitations around plant-based cooking is the question of whether it will satisfy everyone at the table — particularly those who are accustomed to meat-centred meals. This tikka masala addresses that concern directly. Chickpeas are a meaningful source of plant-based protein and dietary fibre, which means this dish is genuinely filling rather than a lighter, compromise version of something else.

Each serving provides approximately 18 grams of protein from the chickpeas alone, alongside iron, folate, and complex carbohydrates from the legumes. The coconut cream contributes healthy fats that support nutrient absorption from the spices — particularly the curcumin in turmeric, which requires fat to be properly absorbed by the body.

Customising the Recipe

This recipe is forgiving and highly adaptable. Here are a few variations worth exploring:

Add vegetables: Spinach, diced sweet potato, or cauliflower florets all work beautifully in this sauce. Add firmer vegetables at the same time as the chickpeas, and stir spinach in during the last two minutes of cooking.

Adjust the heat: The chilli powder quantity in this recipe creates a mild-to-medium heat. Increase it for a spicier result, or replace it entirely with a sweet paprika for a family-friendly version that still has full flavour.

Storing and Reheating.

Store leftovers in an airtight container in the refrigerator for up to four days. The sauce thickens considerably once chilled, so add a small splash of water when reheating. It also freezes exceptionally well — portion it into freezer-safe containers and freeze for up to three months. Defrost overnight in the refrigerator before reheating gently on the stovetop.

A Dish That Brings People Together

Use canned coconut milk instead of cream: Coconut milk will produce a lighter, thinner sauce. Both work well — the choice depends on how rich you want the final dish to be.

Make it ahead: Tikka masala is one of those dishes that genuinely improves overnight. The spices continue to develop, the sauce thickens slightly, and the chickpeas absorb more of the surrounding flavour. Make a double batch and refrigerate for up to four days.

There is something quietly special about a recipe that crosses dietary lines so gracefully. Guests who eat meat rarely notice the absence of it in this dish. What they notice instead is the sauce — its depth, its warmth, its balance. That is the mark of good cooking regardless of what is or is not in the pot.

This chickpea tikka masala has found its way onto my table more times than I can count, and it has become the kind of recipe I return to not because I have to, but because I genuinely want to. I hope it does the same for you.

Serve it to someone you love, or simply make it for yourself on a Tuesday evening when you need something that tastes like effort but takes very little of it. Either way, it will not disappoint.


Looking for more plant-based dinner ideas? Explore our full collection of vegan recipes in the Health & Lifestyle section.