cozy vegan dinner

Golden Sweet Potato and Spinach Curry: Simple, Nourishing, and Deeply Satisfying

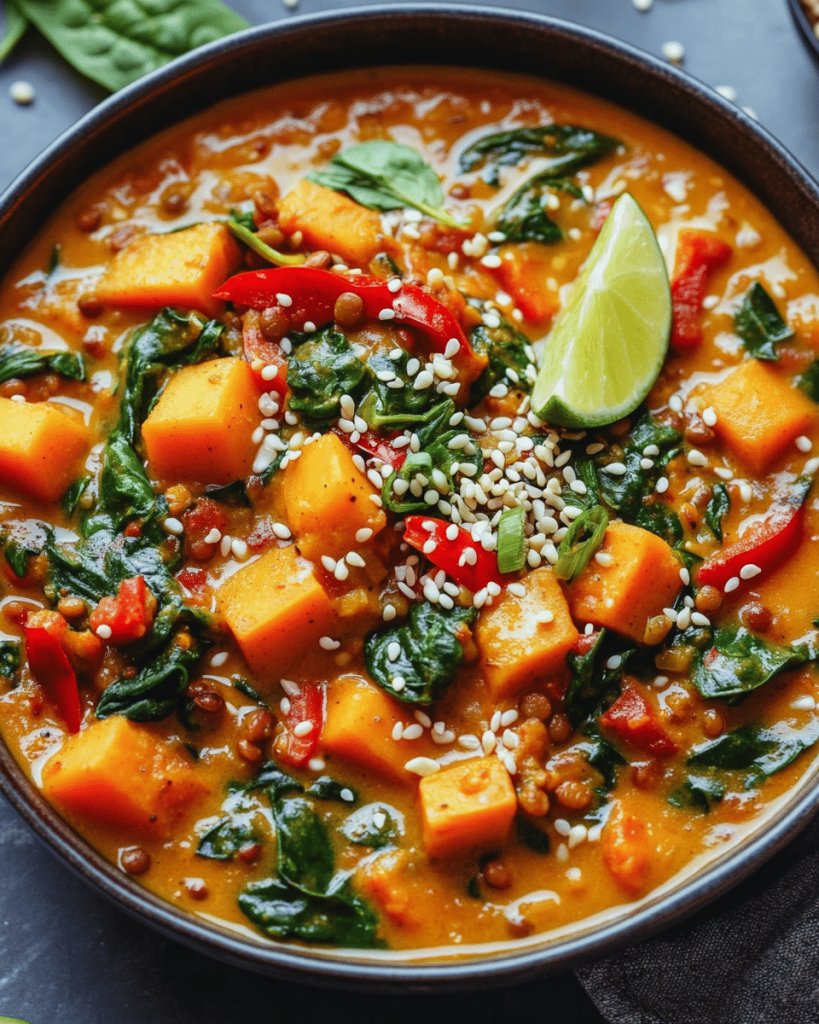
Some recipes become staples not because they are showstoppers, but because they are reliable. They fit into real life — they use affordable, available ingredients, they come together without drama, and they consistently produce something that makes dinner feel taken care of. This sweet potato and spinach curry is that kind of recipe.

It is golden in colour from turmeric and ginger, warming from the blend of spices, naturally sweet from the sweet potato, and made creamy by the coconut milk that brings the whole thing together. It is the kind of curry that makes you reach for more rice because the sauce demands it. It is also, importantly, completely one-pot — which means cleanup is as uncomplicated as the cooking.

I have made this curry for people who avoid curry, for people who are sceptical of vegan food, and for people who are simply hungry on a Tuesday evening and needed something good. It has never let me down.

Why Sweet Potato Works So Well in Curry

Sweet potato is not a traditional curry ingredient across most South Asian cooking traditions, but it earns its place here through its flavour logic. Its natural sweetness provides a counterpoint to the heat and spice of the sauce. Its starchy flesh absorbs the surrounding curry base as it cooks, carrying those flavours deep into each piece. And its vibrant orange colour, set against the golden sauce and dark spinach, makes the dish visually striking before anyone has tasted it.

For the best result, dice the sweet potato into uniform pieces of approximately 2cm. This ensures even cooking — pieces that are too small will dissolve into the sauce, while pieces that are too large will remain firm when the rest of the dish is ready.

Ingredients (Serves 4)

  • 2 large sweet potatoes (approximately 800g), peeled and diced into 2cm cubes
  • 200g baby spinach (or regular spinach, roughly chopped)
  • 1 can (400ml) full-fat coconut milk
  • 1 can (400g) chopped tomatoes
  • 1 medium onion, finely diced
  • 5 garlic cloves, minced
  • 2 tablespoons fresh ginger, grated
  • 2 tablespoons neutral oil
  • 1½ teaspoons ground cumin
  • 1½ teaspoons ground coriander
  • 1½ teaspoons turmeric
  • 1 teaspoon garam masala
  • 1 teaspoon smoked paprika
  • ½ to 1 teaspoon chilli powder (to taste)
  • 1 teaspoon salt, plus more to taste
  • 200ml vegetable stock
  • Juice of ½ lemon

To serve: Basmati rice or naan, fresh coriander, yoghurt alternative, mango chutney

Method

Step 1: Cook the Aromatics

Heat the oil in a large, deep pan or casserole over medium heat. Add the diced onion and a pinch of salt. Cook for 8 to 10 minutes, stirring occasionally, until the onion is soft, golden, and beginning to caramelise — do not rush this step. Add the garlic and ginger and cook for two more minutes.

Step 2: Add the Spices

Add the cumin, coriander, turmeric, smoked paprika, and chilli powder. Stir constantly for 90 seconds to bloom the spices. The mixture will look dry and paste-like — this is correct. The spices need direct contact with the heat to release their essential oils.

Step 3: Add Tomatoes and Sweet Potato

Pour in the chopped tomatoes and stir well, scraping any spices from the bottom of the pan. Add the diced sweet potato and vegetable stock. Stir to combine. Bring to a boil, then reduce to a steady simmer. Cook for 15 to 18 minutes until the sweet potato is tender when pierced with a knife but still holding its shape.

Step 4: Add Coconut Milk and Spinach

Pour in the coconut milk and stir. Simmer for five more minutes. Add the baby spinach in large handfuls, stirring after each addition until wilted. The spinach will reduce dramatically in volume. Add the garam masala, lemon juice, and additional salt to taste.

Step 5: Serve

Serve over fluffy basmati rice or with warm naan. Top with fresh coriander, a dollop of vegan yoghurt or coconut yoghurt, and mango chutney if desired.

The Importance of Garam Masala at the End

Garam masala is a fragrant, complex blend of warm spices — typically including cardamom, cloves, cinnamon, and black pepper — and it behaves differently from other spices in cooking. While base spices like cumin and coriander benefit from long cooking and blooming in hot oil, garam masala is most fragrant when added at the very end of cooking. The heat of the dish is sufficient to activate it without the prolonged cooking that would diminish its delicate floral notes.

This distinction makes a meaningful difference to the final flavour of the curry. Add it too early and it becomes background noise; add it at the end and it perfumes the entire dish.

Nutrition

This curry is a nutritional standout even within the context of plant-based cooking. Sweet potato provides extraordinary amounts of beta-carotene — more than almost any other food — along with vitamin C, potassium, and dietary fibre. Spinach contributes iron, vitamin K, folate, and antioxidants including lutein and zeaxanthin, which support eye health.

Turmeric deserves particular mention. Its active compound, curcumin, has been extensively studied for its anti-inflammatory properties. The fat in coconut milk helps the body absorb curcumin more effectively — another example of how traditional spiced cooking demonstrates an intuitive nutritional wisdom.

Together, this curry provides a substantial and well-balanced meal that genuinely supports health rather than simply avoiding harm.

Make-Ahead

This curry is an excellent candidate for batch cooking. Prepare a double quantity on a Sunday evening and refrigerate in portions — it reheats beautifully and the flavours continue to improve over the following two to three days. Freeze in sealed containers for up to three months.

When reheating, add a small splash of vegetable stock or water to loosen the sauce, which will have thickened considerably in the refrigerator.

Variations

Add protein: Stir in a can of drained chickpeas or white beans alongside the sweet potato for additional protein and fibre.

Make it richer: Replace 100ml of vegetable stock with an additional half can of coconut milk for an even more indulgent sauce.

Add heat: A finely diced fresh green chilli added with the aromatics, or a swirl of chilli oil at the end, increases the heat considerably.

Use pumpkin: Butternut squash or pumpkin can replace the sweet potato with equally excellent results.

Final Thoughts

A curry should feel like it was made with care, and this one does. It has the warmth and depth of something that has been simmering on a stove all afternoon, even though it takes forty minutes from start to finish. It fills the kitchen with one of the best smells imaginable. And it produces the kind of dinner that people remember and ask you to make again.

That is all a recipe needs to be.


Explore more warming plant-based meals in our Website.

The Best Vegan Chili: A Three-Bean Pot That Gets Better Every Day

A great chili is one of cooking’s most honest achievements. It does not ask for complicated technique or expensive ingredients. It asks for time, patience, good spices, and the willingness to let it simmer until it becomes something greater than the sum of its parts. What you end up with — a deeply flavoured, slightly smoky, richly seasoned pot of beans and vegetables — is the kind of food that fills a kitchen with warmth and a table with contentment.

This three-bean vegan chili has become, without exaggeration, the most-requested recipe among everyone who has tried it. The combination of kidney beans, black beans, and pinto beans gives the chili a complexity of texture and flavour that single-bean versions lack. The spice blend is layered and deliberate. And the addition of dark chocolate — yes, chocolate — at the end is the detail that makes people ask the question.

“What is that flavour? What did you put in this?”

The answer is always worth seeing their faces when you tell them.

The Role of Each Ingredient

Before the recipe, a brief word on why certain ingredients are here:

Three beans: Different beans bring different textures. Kidney beans are firm and substantial. Black beans are softer and earthier. Pinto beans sit somewhere in between. Together, they create a chili with textural dimension.

Dark chocolate: A small amount of good-quality dark chocolate (70% or above) added at the end of cooking adds depth, a subtle bitterness, and a richness that is felt rather than tasted. It is a technique used across Mexican mole cuisine and works extraordinarily well in chili.

Coffee: Brewed black coffee, added during cooking, deepens the umami of the dish without imparting a discernible coffee flavour. It is optional but worth including.

Apple cider vinegar: Added at the very end of cooking, a tablespoon of vinegar brightens the entire pot and balances the richness of the beans and spices.

Ingredients (Serves 8)

  • 1 can (400g) kidney beans, drained and rinsed
  • 1 can (400g) black beans, drained and rinsed
  • 1 can (400g) pinto beans, drained and rinsed
  • 2 cans (800g) chopped tomatoes
  • 3 tablespoons tomato paste
  • 500ml vegetable stock
  • 100ml brewed black coffee (optional)
  • 2 large onions, finely diced
  • 6 garlic cloves, minced
  • 2 red bell peppers, diced
  • 2 stalks celery, diced
  • 1 jalapeño, finely diced (optional)
  • 3 tablespoons olive oil
  • 3 teaspoons ground cumin
  • 2 teaspoons smoked paprika
  • 2 teaspoons chilli powder
  • 1 teaspoon ground coriander
  • 1 teaspoon dried oregano
  • ½ teaspoon ground cinnamon
  • ½ teaspoon cayenne pepper (adjust to heat preference)
  • 30g dark chocolate (70%+), roughly chopped
  • 1 tablespoon apple cider vinegar
  • 1 tablespoon soy sauce
  • Salt and pepper to taste

To serve: Steamed rice or cornbread, sliced avocado, vegan sour cream, fresh coriander, lime wedges, jalapeño slices

Method

Step 1: Build the Aromatics

Heat the olive oil in a large, heavy-bottomed pot over medium heat. Add the onions, celery, and red peppers with a good pinch of salt. Cook for 10 to 12 minutes, stirring occasionally, until the vegetables are soft and the onions are beginning to turn golden. Add the garlic and jalapeño (if using) and cook for two more minutes.

Step 2: Toast the Spices

Add all the dried spices: cumin, smoked paprika, chilli powder, ground coriander, oregano, cinnamon, and cayenne. Stir constantly for 90 seconds — the spices will become fragrant and the bottom of the pot may begin to darken slightly. This is the blooming step: it transforms the raw, slightly harsh flavour of dried spices into something rounded and complex.

Step 3: Add the Tomatoes and Liquids

Add the tomato paste and stir for two minutes to caramelise it. Pour in the chopped tomatoes, soy sauce, vegetable stock, and coffee if using. Stir well to scrape any caramelised bits from the bottom of the pot.

Step 4: Add the Beans and Simmer

Add all three types of drained beans. Stir to combine. Bring to a boil, then reduce to a low, steady simmer. Cook uncovered for 35 to 45 minutes, stirring occasionally, until the chili has thickened to your preferred consistency and the flavours have deepened significantly. A thick chili clings to a spoon; a thinner one flows. Both are correct — adjust the cooking time to preference.

Step 5: The Final Touches

Remove from heat. Add the chopped dark chocolate and stir until completely melted. Add the apple cider vinegar and stir. Taste carefully and season with salt and pepper. This final tasting and seasoning step is not optional — it transforms a good chili into a great one.

Step 6: Rest and Serve

Allow the chili to rest for 10 minutes before serving. This resting time allows the flavours to settle and the consistency to stabilise. Serve over steamed rice or with warm cornbread, topped with sliced avocado, fresh coriander, a squeeze of lime, and vegan sour cream.

Day Two is Better

I will make a direct recommendation: make this chili the day before you plan to serve it. The flavours of a chili — the interplay of spices, beans, tomato, and chocolate — continue to develop as it rests. A 24-hour-old chili is measurably better than a freshly made one. This makes it ideal for dinner parties, meal prepping, and any situation where you want excellent food with minimal same-day effort.

Storage and Freezing

Refrigerate in sealed containers for up to five days. Freeze in portions for up to four months. This is one of the best freezer meals you can make — it thaws and reheats beautifully, with no loss of flavour or texture.

Nutrition

This chili is genuinely one of the most nutritionally complete meals in this collection. Three varieties of beans provide a combined total of approximately 25 grams of protein per serving, along with extraordinary amounts of dietary fibre — approximately 20 grams per serving — iron, potassium, folate, and complex carbohydrates. The fibre content alone makes this one of the best gut-health meals you can eat.

Dark chocolate contributes flavanols — powerful antioxidants with established cardiovascular benefits — and adds iron. Tomatoes provide lycopene, and the bell peppers contribute more vitamin C per serving than most citrus fruits.

A Recipe Worth Keeping

Every cook should have one chili recipe that they know inside out — one that they can make from memory, adjust by instinct, and serve with confidence on any occasion. This is the recipe I would offer for that role.

Make it once, make it twice, and then make it yours.


Find more hearty plant-based meals in our Website.

Classic Red Lentil Soup: The Vegan Bowl That Has Fed the World for Centuries

Red lentil soup is one of the oldest prepared foods in human history. Across the Middle East, the Indian subcontinent, the Mediterranean, and North Africa, variations of this humble, warming dish have nourished people for thousands of years. There is a reason for that longevity: it is one of the most satisfying, affordable, and nutritionally complete meals that can be prepared with minimal equipment and modest ingredients.

This version draws inspiration from the Turkish mercimek çorbası — a smooth, warmly spiced soup finished with a smoky red pepper and butter drizzle that transforms the bowl from simple to extraordinary. The drizzle takes less than two minutes to prepare, but it is the detail that elevates everything.

If you cook this soup once, you will understand why it has endured.

Ingredients (Serves 6)

  • 350g red lentils, rinsed thoroughly
  • 1 large onion, diced
  • 4 garlic cloves, minced
  • 2 medium carrots, diced
  • 2 stalks celery, diced
  • 1 can (400g) chopped tomatoes
  • 1.5 litres vegetable stock
  • 2 teaspoons ground cumin
  • 1 teaspoon ground turmeric
  • 1 teaspoon smoked paprika
  • ½ teaspoon ground coriander
  • ½ teaspoon chilli flakes
  • 3 tablespoons olive oil
  • Juice of 1 large lemon
  • Salt and black pepper to taste

For the red pepper drizzle:

  • 3 tablespoons olive oil or vegan butter
  • 1 teaspoon smoked paprika
  • ½ teaspoon chilli flakes

To serve: Fresh parsley or coriander, lemon wedges, warm flatbread

Method

Build the base: Heat olive oil in a large pot over medium heat. Add the onion, carrots, and celery with a pinch of salt. Cook for 10 minutes until softened. Add garlic and all the spices. Cook for one minute.

Add liquids: Add the chopped tomatoes and stir for two minutes. Add the rinsed lentils and vegetable stock. Bring to a boil, then reduce to a steady simmer. Cook uncovered for 20 to 25 minutes until the lentils have completely broken down and the soup is thick.

Blend: Use an immersion blender to blend about two-thirds of the soup, leaving some texture. Alternatively, blend all of it for a completely smooth result. Stir in the lemon juice and adjust seasoning.

Make the drizzle: In a small pan, heat the olive oil over medium heat. Add the smoked paprika and chilli flakes. Swirl for 30 seconds — the oil will turn a deep red and become fragrant. Pour immediately over the bowls of soup.

Serve: Ladle into warmed bowls, drizzle with the red pepper oil, and garnish with fresh herbs and lemon wedges. Serve with warm flatbread for dipping.

Nutrition and Storage

Red lentils are extraordinarily rich in plant-based protein, iron, and folate. They also cook faster than any other lentil variety and require no soaking. This soup provides approximately 18 grams of protein and 14 grams of fibre per serving, making it one of the most nutritionally efficient meals in plant-based cooking.

Refrigerate for up to five days or freeze for up to four months. It thickens considerably on storage — add stock or water when reheating.


Discover more warming plant-based recipes in our Website.

Roasted Butternut Squash Soup: The Vegan Bowl That Feels Like a Hug

There is a particular kind of afternoon — grey sky, cold air pressing at the windows, the day already feeling shorter than it should — where nothing matters more than a bowl of good soup. Not soup from a tin or a carton, but real soup: the kind that fills the kitchen with warmth while it is cooking, that smells like autumn itself, and that tastes like someone genuinely made it for you.

This roasted butternut squash soup is that soup. It is velvet-smooth, naturally sweet, subtly spiced, and finished with a swirl of coconut cream that adds a richness without heaviness. Roasting the squash before blending is the step that separates a good squash soup from a great one — it concentrates the sugars, caramelises the edges, and develops a depth of flavour that boiling simply cannot replicate.

This is also one of the most forgiving recipes you can make. The squash is difficult to overcook. The blending step is straightforward. And the final result is so consistently excellent that it has become my most-made soup of the autumn and winter seasons, and one of the first recipes I share when someone tells me they are curious about cooking more plant-based food.

Why Roasting Makes the Difference

When you boil butternut squash, the water draws flavour out of the vegetable into the cooking liquid. Some of that ends up in the soup, but much of the natural sugars and flavour compounds are diluted. When you roast it, the opposite happens: the moisture evaporates, the sugars concentrate and caramelise at the cut surfaces, and the squash develops a complexity that intensifies further when blended.

The same principle applies to the garlic and onion in this recipe. Roasting them alongside the squash — rather than softening them separately on the stovetop — gives the soup a mellow, slightly sweet base that is markedly different from the sharper flavour of raw-sautéed alliums.

If you have an extra twenty minutes, roast everything together. The soup will be better for it.

Ingredients (Serves 4–6)

  • 1 large butternut squash (approximately 1.2kg), peeled, seeded, and diced into 3cm chunks
  • 1 large onion, quartered
  • 6 garlic cloves, unpeeled
  • 3 tablespoons olive oil
  • 1 litre vegetable stock (good quality, ideally homemade or low-sodium)
  • 1 can (400ml) coconut milk or coconut cream
  • 2 teaspoons ground ginger
  • 1 teaspoon ground cumin
  • ½ teaspoon smoked paprika
  • ¼ teaspoon ground nutmeg
  • ¼ teaspoon ground cinnamon
  • Salt and black pepper to taste
  • 1 tablespoon apple cider vinegar or fresh lemon juice (to brighten)

To serve:

  • Coconut cream, swirled
  • Toasted pumpkin seeds
  • Chilli flakes or fresh red chilli
  • Fresh thyme or flat-leaf parsley
  • Crusty sourdough bread

Method

Step 1: Roast the Vegetables

Preheat your oven to 200°C (180°C fan). Arrange the diced squash and quartered onion on a large, lined baking tray. Scatter the unpeeled garlic cloves over the top. Drizzle generously with olive oil and season with salt and pepper. Toss everything to coat, then spread into a single layer.

Roast for 35 to 40 minutes, turning the squash once halfway through, until the squash is completely tender and beginning to caramelise at the edges, and the onion is golden and softened. The garlic cloves should feel completely soft when pressed. Remove from the oven.

Step 2: Prepare for Blending

Allow the roasted vegetables to cool for 5 minutes. Squeeze the roasted garlic from its skins directly into your blender or soup pot, discarding the papery husks. Transfer the squash and onion as well.

Step 3: Add the Spices and Blend

Add the ground ginger, cumin, smoked paprika, nutmeg, and cinnamon to the blender along with half the vegetable stock. Blend until completely smooth. If using an immersion blender, transfer everything to a large pot and blend directly in the pot. Work in batches if necessary to avoid overfilling a standard blender.

Step 4: Finish the Soup

Pour the blended soup into a large saucepan over medium heat. Add the remaining vegetable stock and the coconut milk, stirring to combine. Adjust the consistency with additional stock if the soup is thicker than you prefer. Simmer gently for 10 minutes to allow the spices to mellow and the flavours to integrate.

Add the apple cider vinegar or lemon juice — this small addition lifts the entire soup, cutting through the sweetness of the squash and the richness of the coconut. Taste carefully and adjust the salt, pepper, and spice levels.

Step 5: Serve

Ladle into warmed bowls. Add a swirl of coconut cream, a small handful of toasted pumpkin seeds, a pinch of chilli flakes, and fresh herbs. Serve immediately with crusty bread for dipping.

Warming Spice Combinations to Explore

The spice blend in this recipe is warming and gently exotic without being overwhelming. But there are several excellent variations worth exploring once you have made the base recipe:

Thai-inspired: Replace the spice blend with 2 tablespoons of red Thai curry paste and add a stalk of lemongrass to the roasting tray. Remove before blending.

Moroccan style: Use ras el hanout in place of the individual spices, and add a tablespoon of harissa to the finished soup for heat and complexity.

Classic autumn: Omit the ginger and cumin, increase the cinnamon and nutmeg, and finish with a drizzle of good maple syrup and a sprig of fresh sage fried crispy in butter.

Each variation produces a distinctly different soup while maintaining the same essential sweetness and silkiness of the base.

Nutrition and Wellness

Butternut squash is among the most nutrient-dense winter vegetables available. It is exceptionally rich in beta-carotene — the precursor to vitamin A — with a single cup providing well over the daily recommended intake. Vitamin A supports immune function, skin cell turnover, and eye health, making squash an especially valuable ingredient in the colder months when immune resilience is a priority.

The squash also provides meaningful amounts of vitamin C, potassium, magnesium, and dietary fibre. Coconut milk contributes medium-chain triglycerides — a form of saturated fat that is metabolised differently from long-chain fats and has been associated with improved energy metabolism in some research contexts.

Pumpkin seeds, used here as a garnish, are a concentrated source of zinc, magnesium, and plant-based omega-3 fatty acids. Even a small handful on top of each bowl adds genuine nutritional value alongside texture.

Storage and Meal Prep

This soup keeps well and is ideal for batch cooking. Refrigerate in sealed containers for up to five days. It thickens considerably on refrigeration — simply add a small amount of water or stock when reheating and stir to restore the original consistency.

To freeze, allow the soup to cool completely and portion into freezer-safe containers. Leave a small amount of headspace to allow for expansion. Freeze for up to four months. Thaw overnight in the refrigerator and reheat gently, stirring frequently to prevent the coconut milk from separating.

This soup also packs well in a thermos for work lunches or outdoor activities. Keep the toppings in a separate small container and add at the moment of serving.

Final Thoughts

A great soup is one of the simplest proofs that cooking well is not about complexity — it is about understanding your ingredients and giving them what they need. Butternut squash needs heat to become its best self. Spices need a moment to bloom. Acid needs to be added at the end to preserve its brightness.

Give this recipe those small attentions, and it will reward you with a bowl of soup that is genuinely, unreservedly excellent. Make a large pot. Share it if you can. Keep the rest for the days when you need it most.


Find more nourishing plant-based recipes in our Website.