high protein vegan dinner

Stuffed Bell Peppers with Quinoa and Black Beans: A Vibrant Vegan Dinner

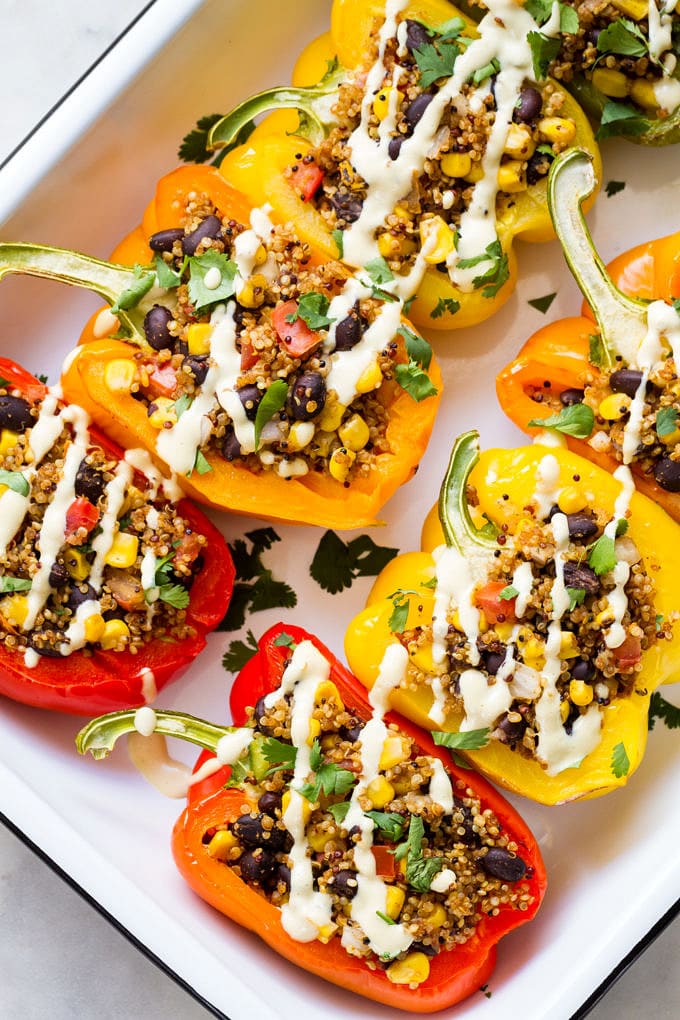
There is something inherently appealing about a stuffed vegetable. It is a dish with visual confidence — whole, colourful, and presented with an honesty that says exactly what it is. A stuffed pepper brings the container and the meal together into a single, self-sufficient package, and that simplicity is part of its enduring charm.

These quinoa and black bean stuffed bell peppers are everything a weeknight dinner should be: uncomplicated to prepare, genuinely satisfying to eat, and versatile enough to accommodate whatever you have in the pantry. The filling is warm, spiced, and deeply flavoured. The peppers soften in the oven until they are tender and slightly caramelised. Together, they make a complete meal with very little cleanup required.

What I particularly like about this recipe is how well it scales. A single tray accommodates six large peppers, which is enough to feed a family or provide meal-prepped lunches through the week. The filling is also excellent on its own — served over rice, wrapped in a tortilla, or simply eaten from the pan with a spoon. It is one of those versatile base recipes that earns its place in any cook’s rotation.

Choosing Your Peppers

Bell peppers come in four colours at most supermarkets — green, yellow, orange, and red — and they are not interchangeable in terms of flavour. Green peppers are the least ripe and have a distinct bitterness that some find appealing and others find challenging. Red, orange, and yellow peppers are all sweeter — they have been allowed to ripen longer on the plant, converting their chlorophyll to carotenoids as they develop their colour and sweetness.

For this recipe, red and orange peppers are the most complementary to the filling’s warm spice profile. Their natural sweetness balances the cumin and chilli beautifully. Yellow peppers also work well. Green peppers are not ideal here — their bitterness can compete with rather than complement the filling.

Choose peppers that are firm, glossy, and have a flat bottom — they will sit more stably in the baking dish.

Ingredients (Serves 6)

For the filling:

  • 200g quinoa, rinsed
  • 2 cans (800g) black beans, drained and rinsed
  • 1 can (400g) chopped tomatoes
  • 1 can (200g) sweetcorn, drained
  • 1 medium onion, finely diced
  • 4 garlic cloves, minced
  • 1 jalapeño, finely diced (optional)
  • 2 teaspoons ground cumin
  • 1½ teaspoons smoked paprika
  • 1 teaspoon chilli powder
  • 1 teaspoon dried oregano
  • 2 tablespoons olive oil
  • Salt and pepper to taste
  • A large handful of fresh coriander, roughly chopped
  • Juice of 1 lime

For the peppers:

  • 6 large bell peppers (red, orange, or yellow)
  • 2 tablespoons olive oil
  • Salt and pepper

To serve:

  • Sliced avocado or guacamole
  • Vegan sour cream or cashew cream
  • Extra lime wedges and coriander
  • Hot sauce

Method

Step 1: Cook the Quinoa

Rinse the quinoa thoroughly in a fine-mesh sieve under cold running water — this removes the naturally occurring saponins on the surface that can taste bitter. Place in a saucepan with 400ml of water and a pinch of salt. Bring to a boil, reduce to a very low simmer, cover, and cook for 12 to 15 minutes until all the water has been absorbed and the quinoa is tender with small white tails visible. Remove from heat and leave covered for five minutes, then fluff with a fork.

Step 2: Prepare the Peppers

Preheat the oven to 200°C (180°C fan). Slice the tops off the peppers and remove the seeds and membranes from inside. If any peppers wobble, slice a very thin sliver from the bottom to create a stable base — be careful not to cut through to the hollow interior.

Brush the outside of the peppers lightly with olive oil, season with salt and pepper, and arrange upright in a baking dish. If the peppers lean against each other, that is perfectly fine — they will support each other during baking.

Pre-bake the empty pepper shells for 15 minutes. This head start ensures they will be fully tender by the time the filling is heated through — skipping this step often results in peppers that are still slightly firm when the filling is ready.

Step 3: Make the Filling

While the peppers pre-bake, heat olive oil in a large pan over medium heat. Add the onion and cook for 7 to 8 minutes until softened and golden. Add the garlic and jalapeño (if using) and cook for one more minute. Add the cumin, smoked paprika, chilli powder, and oregano. Stir for one minute to bloom the spices.

Add the chopped tomatoes, stir well, and simmer for 5 minutes. Add the black beans, sweetcorn, and cooked quinoa. Stir to combine and season generously with salt and pepper. Simmer for three to four minutes to allow the flavours to integrate. Remove from heat and stir in the fresh coriander and lime juice.

Step 4: Fill and Bake

Remove the pre-baked pepper shells from the oven. Spoon the filling generously into each pepper, packing it firmly and mounding it above the rim. Return to the oven and bake for a further 20 to 25 minutes, until the peppers are completely tender and beginning to char slightly at the edges.

Step 5: Serve

Allow to rest for five minutes. Serve with sliced avocado, a dollop of vegan sour cream or cashew cream, extra lime wedges, and fresh coriander.

Why Quinoa Is Worth Using Here

Quinoa has earned a somewhat polarising reputation — sometimes celebrated, sometimes mocked for its association with a certain style of wellness culture. Setting aside that baggage, it is simply a very good ingredient, and this is an ideal recipe to see why.

Quinoa is one of the rare plant foods that provides all nine essential amino acids in meaningful quantities, making it a complete protein source. It also cooks relatively quickly, has a pleasant, slightly nutty flavour, and absorbs surrounding seasonings beautifully. In this filling, it provides bulk and protein alongside the black beans, creating a genuinely satisfying and nutritionally well-rounded meal.

Each serving of two stuffed peppers provides approximately 20 grams of protein, 14 grams of fibre, and substantial amounts of vitamins A and C from the peppers themselves.

Make-Ahead and Storage

The filling can be made up to two days in advance and refrigerated in a sealed container. The pre-baked pepper shells can also be prepared a day ahead. When ready to eat, simply fill and bake as directed, adding five extra minutes of baking time if the filling is cold.

Leftover stuffed peppers store well in the refrigerator for up to three days. Reheat in a 180°C oven for 15 minutes, or microwave individual peppers for two to three minutes.

The filling freezes well — freeze in portions for up to three months and thaw overnight before using. Fully assembled and baked peppers do not freeze as successfully, as the pepper can become very soft on thawing.

Variations

Mediterranean style: Replace the cumin and chilli with dried oregano and basil. Use white beans instead of black beans, add chopped sun-dried tomatoes and kalamata olives to the filling, and finish with pine nuts and fresh basil.

Indian-spiced: Use brown rice instead of quinoa, swap black beans for chickpeas, and season the filling with garam masala, turmeric, and ginger. Serve with a drizzle of mango chutney.

Mushroom and lentil: Replace the quinoa and beans with cooked Puy lentils and finely diced sautéed mushrooms for a heartier, earthier filling.

Final Thoughts

Stuffed peppers are one of those reliable recipes that asks very little of you in terms of technique but rewards you consistently. They look impressive on the table. They travel well in lunch containers. They reheat beautifully. And they are the kind of dish that adapts gracefully to whatever your pantry offers on a given evening.

Make them once, and they will become part of your regular rotation. That is the best thing I can say about any recipe.


Find more nourishing plant-based recipes in our Website.

Vegan Shepherd’s Pie: The Ultimate Plant-Based Comfort Food

Few dishes carry the emotional weight of a shepherd’s pie. It is the kind of food that shows up at the table in winter, when the windows are fogged and the daylight is short, and it asks very little of you except that you sit down and eat. It is generous, warming, and deeply comforting — a meal that seems to understand what you need before you do.

This vegan version honours that spirit completely. The filling is built on lentils, mushrooms, and root vegetables slow-cooked in a rich, herbaceous gravy that is every bit as satisfying as the traditional lamb-based original. The topping is a cloud of creamy, golden mashed potato that blankets the filling and crisps beautifully in the oven. Together, they create a dish that I genuinely believe most people would struggle to identify as entirely plant-based.

The key to this recipe is the lentil and mushroom combination. Lentils provide body, protein, and a satisfying earthiness. Finely diced mushrooms — particularly if you allow them to cook down properly — take on an almost meaty texture and release a depth of umami flavour that forms the backbone of the filling. This is not a dish that imitates meat; it is a dish that builds its own compelling case.

Ingredients (Serves 6)

For the filling:

  • 250g green or brown lentils, rinsed (or 2 cans cooked lentils, drained)
  • 400g chestnut or portobello mushrooms, very finely diced
  • 2 medium carrots, diced into small cubes
  • 2 stalks celery, diced
  • 1 medium onion, finely diced
  • 4 garlic cloves, minced
  • 150g frozen peas
  • 2 tablespoons tomato paste
  • 2 tablespoons soy sauce
  • 1 tablespoon Worcestershire sauce (vegan version)
  • 250ml red wine or additional vegetable stock
  • 400ml vegetable stock
  • 2 tablespoons plain flour
  • 1 tablespoon fresh rosemary, finely chopped
  • 1 tablespoon fresh thyme leaves
  • 2 tablespoons olive oil
  • Salt and black pepper

For the mashed potato topping:

  • 1.2kg floury potatoes (Maris Piper or King Edward), peeled and quartered
  • 4 tablespoons vegan butter
  • 100ml unsweetened oat milk or plant milk of choice
  • 1 teaspoon Dijon mustard
  • Salt, white pepper, and a pinch of nutmeg

Method

Step 1: Cook the Lentils (if using dried)

If using dried lentils, place them in a saucepan with plenty of cold water. Bring to a boil and simmer for 20 to 25 minutes until tender but holding their shape. Drain and set aside. If using canned lentils, drain and rinse them and proceed directly to the filling.

Step 2: Build the Filling

Heat the olive oil in a large, deep pan or casserole over medium heat. Add the onion, carrots, and celery with a pinch of salt. Cook for 10 minutes, stirring occasionally, until softened. Add the garlic and cook for one more minute.

Turn the heat to high, add the diced mushrooms, and cook without stirring for two to three minutes to allow them to brown. They will release a lot of liquid — continue cooking, stirring occasionally, until this liquid has evaporated and the mushrooms are deeply golden. This step is essential for developing the meaty depth of the filling.

Reduce the heat to medium. Add the tomato paste and cook for two minutes, stirring. Sprinkle over the flour and stir well to coat everything — this will thicken the gravy. Add the red wine (or extra stock) and let it bubble for two minutes, then add the vegetable stock, soy sauce, Worcestershire sauce, rosemary, and thyme. Stir well.

Add the cooked lentils and stir to combine. Simmer over low heat for 15 to 20 minutes until the gravy is thick and rich. Add the frozen peas in the final two minutes of cooking. Taste and season generously with salt and black pepper.

Step 3: Make the Mashed Potato

While the filling simmers, cook the potatoes in a large pan of well-salted boiling water for 15 to 20 minutes until completely tender. Drain thoroughly, then return to the pan over low heat for one minute to steam off excess moisture — this step produces a fluffier mash.

Remove from heat. Mash until completely smooth. Add the vegan butter, plant milk, Dijon mustard, salt, white pepper, and a pinch of nutmeg. Beat with a wooden spoon until light and creamy. The mash should be rich and smooth — add more plant milk if needed to reach the right consistency.

Step 4: Assemble and Bake

Preheat your oven to 200°C (180°C fan). Transfer the filling to a large baking dish — approximately 30cm × 22cm — and spread it evenly. Spoon the mashed potato over the top, spreading it gently to cover the filling completely. Use a fork to create a ridged pattern across the surface — these ridges will catch the heat and crisp up beautifully in the oven.

Bake for 25 to 30 minutes until the mash is golden in places and the filling is visibly bubbling at the edges.

Step 5: Rest and Serve

Allow to rest for 5 to 10 minutes before serving — the filling will settle and become easier to portion. Serve with steamed green beans, tenderstem broccoli, or a simple green salad.

Why This Works Nutritionally

This dish is a nutritional complete meal in a single baking dish. Lentils are one of the most impressive sources of plant-based nutrition: a single cup provides around 18 grams of protein, 16 grams of dietary fibre, and substantial amounts of iron, folate, and potassium. They are also one of the most affordable sources of protein available, making this a dish that nourishes without straining a budget.

Carrots provide beta-carotene, celery contributes anti-inflammatory compounds, and mushrooms bring vitamin D and B vitamins to the mix. The potato topping, while primarily a source of comfort, also provides meaningful amounts of potassium and vitamin C — particularly when the skins are left on and the potatoes are cooked gently.

Storage and Freezing

This shepherd’s pie stores beautifully. Cover and refrigerate for up to four days, reheating portions in the oven at 180°C for 20 minutes or in the microwave. It also freezes exceptionally well — either as a whole assembled dish before or after baking, or in individual portions. Freeze for up to three months and thaw overnight in the refrigerator before reheating.

For best results when reheating from frozen, cover the dish with foil and bake at 180°C for 35 to 40 minutes, removing the foil for the final 10 minutes to re-crisp the topping.

Variations

Root vegetable topping: Replace half the potato with celeriac or parsnip for a more complex, slightly sweet topping that pairs particularly well with the herby filling.

Add red wine: If you have a bottle open, a generous splash of red wine added after the mushrooms caramelise adds a wonderful depth to the gravy. Let it reduce by half before adding the stock.

Sweeten the filling: A tablespoon of balsamic vinegar stirred through the filling at the end adds a gentle sweetness and extra complexity to the gravy.

Final Thoughts

There is a reason dishes like shepherd’s pie endure across generations and cultures: they are built on the principle of substance. They are designed to nourish, to warm, and to be genuinely enjoyed. This plant-based version does not diminish that purpose in any way — it carries it forward, with different ingredients and the same intention.

Make it for a cold evening. Make it for someone who thinks they do not like vegan food. Make it because you want something that will feed you well today and even better tomorrow.

It will do all of those things, and do them well.


Explore more warming plant-based recipes in our Website

Sweet Potato and Black Bean Enchiladas: A Vegan Comfort Food Worth Making Every Week

There are certain meals that achieve something rare — they are simultaneously easy enough for a busy Wednesday evening and impressive enough to serve to guests on a weekend. These sweet potato and black bean enchiladas fall squarely into that category. They are saucy, slightly smoky, generously filled, and topped with a homemade red enchilada sauce that genuinely makes the dish.

I want to be honest about something: the enchilada sauce makes or breaks this recipe. Tinned enchilada sauce is perfectly serviceable, and on a time-pressed evening it is a completely reasonable shortcut. But the homemade version — which takes only fifteen minutes and uses ingredients most kitchens already stock — elevates the dish from good to genuinely memorable. I have included both options below, and you can make your own judgment.

What draws me back to this recipe regularly is how well it reheats. Make a tray on Sunday evening, and you have effortless lunches through the week. The flavours deepen overnight, the filling becomes even more tender, and the sauce settles into the tortillas in a way that is deeply satisfying. It is the kind of cooking that rewards you twice.

On the Filling

Sweet potato and black beans are a partnership built on complementary strengths. Sweet potato brings natural sweetness, a creamy texture, and a vibrant orange colour that makes the filling visually appealing. Black beans contribute earthy, robust protein and a firmness that prevents the filling from becoming stodgy. Together, seasoned with cumin, chilli, and smoked paprika, they create a filling that is layered, complex, and anything but one-dimensional.

The key to the best filling is roasting the sweet potato rather than boiling it. Roasting concentrates its natural sugars, adds caramelised edges, and gives the filling a textural interest that boiled sweet potato simply cannot match. It takes a little longer, but the difference is worth it.

Ingredients (Serves 4–6, approximately 10 enchiladas)

For the filling:

  • 2 medium sweet potatoes, peeled and diced into 1cm cubes
  • 2 cans (800g) black beans, drained and rinsed
  • 1 medium onion, finely diced
  • 3 garlic cloves, minced
  • 1 can (200g) sweetcorn, drained
  • 1 red bell pepper, diced
  • 2 teaspoons ground cumin
  • 1½ teaspoons smoked paprika
  • 1 teaspoon chilli powder
  • Salt and pepper to taste
  • 2 tablespoons olive oil
  • A handful of fresh coriander

For the homemade enchilada sauce:

  • 1 can (400g) chopped tomatoes
  • 2 tablespoons tomato paste
  • 2 teaspoons ground cumin
  • 1½ teaspoons smoked paprika
  • 1 teaspoon chilli powder
  • 1 teaspoon garlic powder
  • 1 teaspoon onion powder
  • 1 tablespoon olive oil
  • 200ml vegetable stock
  • Salt to taste

To assemble:

  • 10 medium flour tortillas
  • Vegan cheese, grated (optional)
  • Sliced avocado, lime, and coriander to serve

Method

Step 1: Roast the Sweet Potato

Preheat your oven to 200°C (180°C fan). Toss the diced sweet potato with one tablespoon of olive oil, a pinch of cumin, salt, and pepper. Spread in a single layer on a lined baking tray. Roast for 25 minutes until tender and lightly caramelised at the edges. Remove from the oven and set aside. Keep the oven on.

Step 2: Make the Enchilada Sauce

While the sweet potato roasts, heat the olive oil in a saucepan over medium heat. Add the tomato paste and cook for two minutes, stirring, to caramelise it slightly. Add the spices — cumin, smoked paprika, chilli powder, garlic powder, onion powder — and stir for one minute. Add the chopped tomatoes and vegetable stock. Simmer for 10 minutes, stirring occasionally, until the sauce has thickened and the flavours have come together. Taste and adjust seasoning. Blend briefly with an immersion blender for a smoother consistency, if preferred.

Step 3: Cook the Filling

Heat the remaining tablespoon of oil in a large pan over medium heat. Add the onion and cook for 6 to 7 minutes until softened. Add the garlic, red pepper, cumin, smoked paprika, and chilli powder. Cook for two more minutes. Add the black beans and sweetcorn. Stir to combine and season generously. Fold in the roasted sweet potato gently, keeping some pieces intact for texture. Add the fresh coriander.

Step 4: Assemble

Spread a thin layer of enchilada sauce across the bottom of a large baking dish. Warm the tortillas briefly in a dry pan or microwave — this makes them more pliable and less likely to crack when rolled. Place a generous spoonful of filling along the centre of each tortilla, roll firmly, and place seam-side down in the dish. Repeat until all filling and tortillas are used.

Pour the remaining enchilada sauce over the top, spreading it to cover the tortillas completely. Sprinkle with grated vegan cheese if using.

Step 5: Bake

Bake in the preheated oven for 20 to 25 minutes until the sauce is bubbling and the tops are lightly golden. Allow to rest for five minutes before serving.

Step 6: Serve

Serve straight from the dish, topped with sliced avocado, a squeeze of lime, and fresh coriander. A simple shredded lettuce salad alongside cuts through the richness beautifully.

Nutritional Information

This dish is a nutritional powerhouse in the most unassuming way. Sweet potatoes are rich in beta-carotene — the precursor to vitamin A — which supports immune function and skin health. They are also a good source of vitamin C, potassium, and dietary fibre. Black beans provide approximately 15 grams of protein and 15 grams of fibre per cup, making them one of the most valuable ingredients in plant-based cooking.

Together, this meal provides a substantial amount of complex carbohydrates for sustained energy, plant-based protein for muscle maintenance, and micronutrients that support overall health. It is the kind of meal you feel as good eating as you feel making it.

Storage and Meal Prep

These enchiladas store exceptionally well. Cover the baking dish tightly with foil and refrigerate for up to four days. Reheat individual portions in the microwave or return the entire dish to a 180°C oven for 15 minutes. Add a small splash of water before reheating to loosen the sauce if needed.

To freeze, assemble the enchiladas completely, including the sauce, but do not bake. Cover tightly with foil and freeze for up to three months. Bake from frozen at 180°C for 40 to 45 minutes, or thaw overnight in the refrigerator and bake for the usual 20 to 25 minutes.

Variations

Add greens: A large handful of spinach or finely chopped kale stirred into the filling at the last moment adds colour and nutrition without changing the flavour profile significantly.

Make it spicier: Add one or two finely diced chipotle peppers in adobo sauce to the enchilada sauce for a deeper, smokier heat.

Use corn tortillas: For a more traditional preparation and a naturally gluten-free version, use corn tortillas instead of flour. Warm them well before rolling to prevent cracking, and work quickly.

Add cashew cream: A drizzle of blended cashew cream over the finished enchiladas adds a luxurious richness and makes the dish feel especially indulgent.

Final Thoughts

What this recipe does well — and what I think sets it apart from a lot of plant-based cooking — is that it does not ask you to pretend. It does not try to be meat. It is simply a deeply flavourful, genuinely satisfying dish built on the merits of its own ingredients. The sweet potato is there because it belongs. The black beans are there because they work. The sauce ties everything together because someone took fifteen minutes to make it properly.

That is cooking at its most honest, and it is the kind of cooking that always tastes best.


Try more hearty plant-based dinner recipes in our website

Creamy Chickpea Tikka Masala: A Plant-Based Twist on a Beloved Classic

There are some dishes that feel like a warm embrace — the kind of meal that makes you slow down, take a breath, and remember that cooking can be one of the most grounding things a person does. Tikka masala is one of those dishes for me. Rich, fragrant, deeply spiced, and finished with a sauce that you will want to mop up with everything in reach, it has long been a favourite in households across the world.

This version swaps the traditional chicken for chickpeas — not as a compromise, but as a genuine upgrade. Chickpeas carry spice beautifully. They have a natural earthiness that pairs wonderfully with the tomato-based sauce, and their firm texture means they hold up through the simmering process without turning to mush. The result is a bowl of food that is satisfying in every sense of the word.

What I love most about this recipe is that it is genuinely achievable on a weeknight. If you keep a few key spices in your pantry and most home cooks do the shopping list is short and the active cooking time is under forty minutes. Yet the flavour suggests something far more laboured. That is the beauty of spices used well.

Understanding the Flavour Base

Before we get into the recipe itself, it is worth talking briefly about what makes a tikka masala sauce taste the way it does because understanding the flavour logic makes you a better cook, not just a better recipe-follower.

The foundation is a deeply cooked onion and tomato base. When you take the time to cook the onions low and slow until they are genuinely golden not merely translucent you develop a natural sweetness and depth that no amount of seasoning can replicate. This step is the most important in the recipe, and it is also the one most people rush. Give it time.

From there, the spice blend does the work. Cumin, coriander, garam masala, turmeric, and smoked paprika come together to create that unmistakable warmth. A generous amount of ginger and garlic rounds out the aromatics. The final touch a swirl of coconut cream softens the edges of the sauce and gives it that distinctive, velvety finish.

Ingredients (Serves 4)

  • 2 cans (800g) chickpeas, drained and rinsed
  • 1 can (400g) chopped tomatoes
  • 1 can (400ml) coconut cream
  • 2 medium onions, finely diced
  • 6 garlic cloves, minced
  • 2 tablespoons fresh ginger, grated
  • 3 tablespoons tomato paste
  • 2 tablespoons neutral oil (such as sunflower or coconut)
  • 1½ teaspoons cumin seeds
  • 1½ teaspoons ground coriander
  • 1 teaspoon turmeric
  • 1 teaspoon smoked paprika
  • 1½ teaspoons garam masala
  • 1 teaspoon chilli powder (adjust to taste)
  • 1½ teaspoons salt, or to taste
  • 1 teaspoon sugar (optional, to balance acidity)
  • Fresh coriander, to serve
  • Basmati rice or naan bread, to serve

Method

Step 1: Build the Base

Heat the oil in a wide, heavy-bottomed pan over medium heat. Add the cumin seeds and let them sizzle for about thirty seconds — you will know they are ready when they begin to pop and release their aroma. Add the diced onions and a pinch of salt. Cook over medium-low heat for 12 to 15 minutes, stirring occasionally, until the onions are deeply golden and beginning to caramelise. This patience is rewarded later in the depth of the sauce.

Step 2: Add Aromatics and Spices

Stir in the garlic and ginger and cook for two minutes. Add the tomato paste and cook for another two minutes, stirring constantly — this brief caramelisation of the paste removes its raw edge and adds another layer of flavour. Now add the ground coriander, turmeric, smoked paprika, and chilli powder. Stir everything together and cook for one minute, letting the spices bloom in the residual oil.

Step 3: Build the Sauce

Pour in the chopped tomatoes and stir well, scraping any caramelised bits from the bottom of the pan. Simmer for 10 minutes, allowing the tomatoes to break down and the sauce to reduce. If you prefer a smoother sauce, use an immersion blender at this point to partially blend it — leaving some texture is perfectly fine too.

Step 4: Add the Chickpeas and Coconut Cream

Add the drained chickpeas and stir to coat them in the sauce. Pour in the coconut cream, reduce the heat to low, and simmer gently for 15 minutes. The sauce will thicken and deepen in colour. Add the garam masala and taste for salt. If the sauce tastes sharp or overly acidic, a small pinch of sugar will balance it beautifully.

Step 5: Rest and Serve

Remove from heat and allow the dish to rest for five minutes before serving. This brief resting time allows the flavours to settle. Serve over fluffy basmati rice or alongside warm naan bread, and finish with a generous handful of fresh coriander.

Why This Works for the Whole Family

One of the most common hesitations around plant-based cooking is the question of whether it will satisfy everyone at the table — particularly those who are accustomed to meat-centred meals. This tikka masala addresses that concern directly. Chickpeas are a meaningful source of plant-based protein and dietary fibre, which means this dish is genuinely filling rather than a lighter, compromise version of something else.

Each serving provides approximately 18 grams of protein from the chickpeas alone, alongside iron, folate, and complex carbohydrates from the legumes. The coconut cream contributes healthy fats that support nutrient absorption from the spices — particularly the curcumin in turmeric, which requires fat to be properly absorbed by the body.

Customising the Recipe

This recipe is forgiving and highly adaptable. Here are a few variations worth exploring:

Add vegetables: Spinach, diced sweet potato, or cauliflower florets all work beautifully in this sauce. Add firmer vegetables at the same time as the chickpeas, and stir spinach in during the last two minutes of cooking.

Adjust the heat: The chilli powder quantity in this recipe creates a mild-to-medium heat. Increase it for a spicier result, or replace it entirely with a sweet paprika for a family-friendly version that still has full flavour.

Storing and Reheating.

Store leftovers in an airtight container in the refrigerator for up to four days. The sauce thickens considerably once chilled, so add a small splash of water when reheating. It also freezes exceptionally well — portion it into freezer-safe containers and freeze for up to three months. Defrost overnight in the refrigerator before reheating gently on the stovetop.

A Dish That Brings People Together

Use canned coconut milk instead of cream: Coconut milk will produce a lighter, thinner sauce. Both work well — the choice depends on how rich you want the final dish to be.

Make it ahead: Tikka masala is one of those dishes that genuinely improves overnight. The spices continue to develop, the sauce thickens slightly, and the chickpeas absorb more of the surrounding flavour. Make a double batch and refrigerate for up to four days.

There is something quietly special about a recipe that crosses dietary lines so gracefully. Guests who eat meat rarely notice the absence of it in this dish. What they notice instead is the sauce — its depth, its warmth, its balance. That is the mark of good cooking regardless of what is or is not in the pot.

This chickpea tikka masala has found its way onto my table more times than I can count, and it has become the kind of recipe I return to not because I have to, but because I genuinely want to. I hope it does the same for you.

Serve it to someone you love, or simply make it for yourself on a Tuesday evening when you need something that tastes like effort but takes very little of it. Either way, it will not disappoint.


Looking for more plant-based dinner ideas? Explore our full collection of vegan recipes in the Health & Lifestyle section.