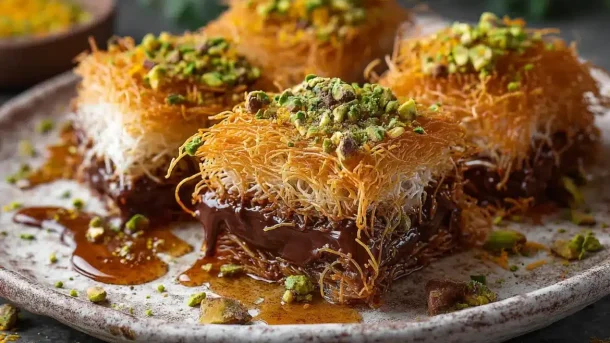
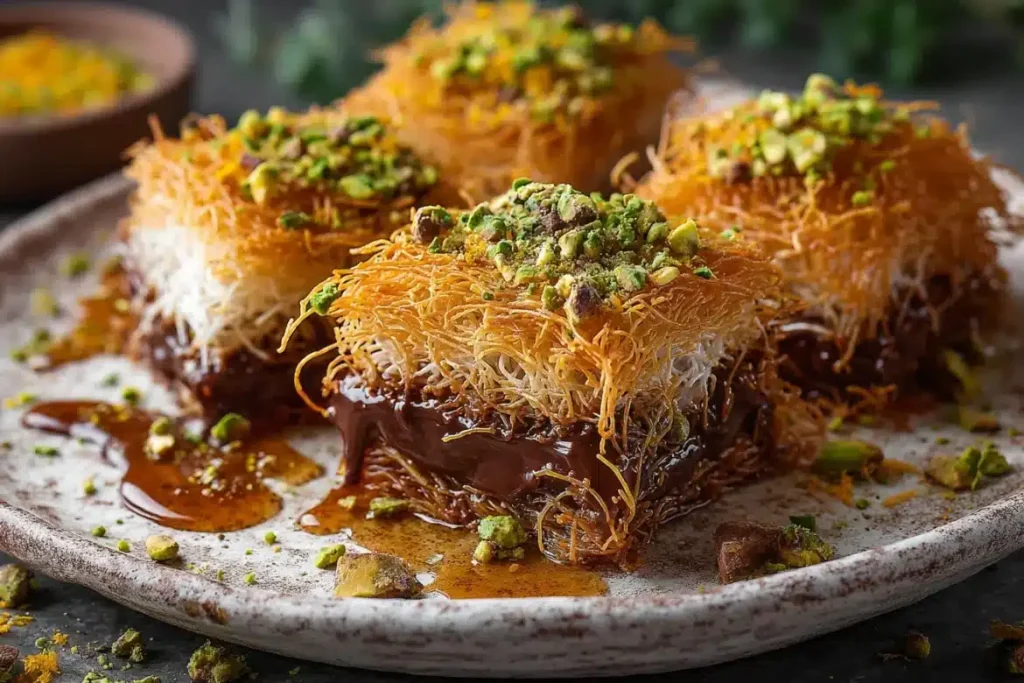
If you have been anywhere near food social media in 2025 and 2026, you already know about Dubai chocolate. The Bar, created by Fix Dessert Chocolatier in Dubai, became perhaps the most talked-about confectionery item of the decade — a thick slab of premium chocolate filled with a layered combination of pistachio cream and crispy, golden kataifi pastry that produces, upon the first bite, a sound and texture combination so satisfying it borders on absurd.
The original sold out within minutes of each release. People flew to Dubai specifically to taste it. Videos of the snap — that deeply satisfying crack through the chocolate shell — accumulated hundreds of millions of views.
Now the question everyone is asking is: can I make it at home? And more specifically: can I make it vegan?
The answer to both is a resounding yes. This recipe creates a fully plant-based version of the Dubai chocolate bar — made with dark chocolate, homemade pistachio cream, and oven-crisped kataifi — that captures every element of the original experience. The snap is there. The filling is extraordinary. And the entire thing costs a fraction of the price.
What Makes Dubai Chocolate Different from Every Other Chocolate Bar
The genius of the Dubai chocolate bar lies in its textural architecture. Most filled chocolates are soft inside — ganache, caramel, fondant. The Dubai bar inverts that expectation entirely by placing a crispy, toasted element at its centre. The kataifi — a fine, vermicelli-like shredded pastry used across Middle Eastern and Greek cuisines — is toasted in butter until it becomes light, crackling, and golden, then mixed with pistachio cream. When enclosed in chocolate and chilled, it maintains its crunch. Each bite delivers simultaneously: the snap of chocolate, the give of the pistachio cream, and the crunch of the kataifi.
It is an experience rather than simply a flavour.
Finding the Ingredients
Kataifi pastry is available in Middle Eastern grocery stores, many specialty food shops, and increasingly in larger supermarkets in the frozen pastry section. If unavailable, very fine vermicelli pasta toasted in butter produces a reasonable substitute — it lacks the exact texture but captures the spirit.
Pistachio cream or pistachio paste can be found in specialty food stores, online, or made at home (recipe included below). It is distinct from pistachio butter — richer, smoother, and slightly sweeter.
Vegan butter replaces the regular butter used in most versions for toasting the kataifi. A high-quality vegan butter (such as Miyoko’s or Naturli) works excellently here.
Dark chocolate (70% or above) is naturally vegan. Check the label for dairy additions, which are present in some brands. Good-quality couverture chocolate produces the best snap and shine.
Ingredients (Makes 6–8 bars or one large 30cm × 20cm bark)
For the chocolate shell:
- 500g dark chocolate (70%+ cocoa, vegan), finely chopped
- 1 tablespoon coconut oil (optional, for a smoother, shinier chocolate)
For the pistachio filling:
- 200g pistachio cream or paste (store-bought or see homemade recipe below)
- 2 tablespoons tahini (adds depth and smooths the texture)
- 1 tablespoon maple syrup
- A pinch of sea salt
- ½ teaspoon vanilla extract
For the crispy kataifi:
- 150g kataifi pastry (or very fine vermicelli as substitute), thawed if frozen
- 3 tablespoons vegan butter
- A pinch of sea salt
- 1 teaspoon maple syrup (optional, for a slightly caramelised finish)
For the homemade pistachio cream (if making from scratch):
- 250g raw unsalted pistachios
- 3 tablespoons coconut cream
- 2 tablespoons maple syrup
- 1 tablespoon neutral oil
- ½ teaspoon vanilla extract
- A pinch of salt
Method
Step 1: Make the Pistachio Cream (if making from scratch)
Soak the raw pistachios in hot water for 15 minutes. This softens them and makes the skin removal easier — though removing skins is optional; it simply produces a greener, more vibrant cream.
Drain and dry the pistachios thoroughly. Transfer to a high-speed blender or food processor. Blend on high for 3 to 5 minutes, stopping to scrape the sides every minute. Add the coconut cream, maple syrup, oil, vanilla, and salt. Continue blending until completely smooth and silky. The cream should flow slowly from a spoon. Add a small amount of additional oil if it seems too thick. Transfer to a jar and refrigerate until needed.
Step 2: Toast the Kataifi
Separate and loosely pull apart the kataifi strands — they are tangled when frozen and need to be loosened before cooking.
Melt the vegan butter in a wide, non-stick pan over medium heat. Add the kataifi and a pinch of salt. Cook, stirring frequently, for 8 to 10 minutes until deeply golden and crispy throughout — not just at the edges. The kataifi should be uniformly bronzed and smell of toasted pastry. Remove from heat, add the maple syrup if using, and toss to coat. Allow to cool completely on a plate. It will crisp further as it cools.
Step 3: Make the Filling
Combine the pistachio cream, tahini, maple syrup, vanilla, and salt in a bowl. Stir until smooth and well combined. Fold in about three quarters of the cooled toasted kataifi, reserving the rest for the top. The mixture should be thick and textured.
Step 4: Temper the Chocolate
For the best snap and shine, tempering the chocolate is recommended — though if you are making this as a refrigerated bark rather than individual bars, you can skip this step.
For a simple temper: Melt two-thirds of the chocolate in a heatproof bowl set over barely simmering water, stirring until it reaches 45°C. Remove from heat, add the remaining chopped chocolate, and stir until melted and the temperature drops to 27°C. Return briefly to the heat to bring it to 31°C for dark chocolate. The coconut oil, if using, can be added at this stage.
For a simpler version: simply melt all the chocolate with the coconut oil in a microwave in 30-second intervals, stirring between each, until just melted and smooth.
Step 5: Assemble
Line a 30cm × 20cm baking tray (or individual bar moulds) with parchment paper. Pour half the melted chocolate across the base and tilt to spread evenly. Refrigerate for 10 minutes until just set.
Remove from the refrigerator. Spread the pistachio-kataifi filling evenly over the set chocolate layer, leaving a small border around the edges. Pour the remaining chocolate over the top, spreading gently to cover the filling completely. Scatter the reserved toasted kataifi over the surface while the chocolate is still soft. Sprinkle with flaky sea salt.
Step 6: Set and Slice
Refrigerate for a minimum of two hours until completely set. For individual bars, score the chocolate with a warm knife before fully set, then cut through once fully hardened. For bark, break into irregular shards.
The Famous Snap: Tips for Success
The video-worthy snap that made Dubai chocolate famous depends on properly crystallised chocolate. If your chocolate snap is soft or bendy rather than clean and sharp, the chocolate was not tempered correctly. For home cooks who find tempering challenging, the simplest solution is to use a high-quality chocolate (at least 70% cocoa) and allow the bark to come to room temperature for 15 minutes before cutting — this prevents shattering.
Storage
Store the finished bars or bark between layers of parchment in an airtight container in the refrigerator for up to two weeks. Remove from the refrigerator 10 minutes before eating — the pistachio cream is at its best flavour and texture when slightly above fridge temperature.
Do not freeze the assembled bars — the kataifi loses its crunch on thawing.
Nutritional Notes
Dark chocolate (70%+) provides flavanols — potent antioxidants with demonstrated benefits for cardiovascular health, including improved blood flow and reduced LDL oxidation. Pistachios are one of the most nutritionally complete tree nuts, providing complete protein, heart-healthy monounsaturated fats, vitamin B6, and potassium. Tahini adds calcium, iron, and additional healthy fats.
This is a dessert, not a health food — but it is one made from genuinely wholesome ingredients with real nutritional value.
Why This Belongs on Your 2026 Recipe List
The Dubai chocolate represents something significant in the food trend landscape: the mainstreaming of Middle Eastern flavours and ingredients. Kataifi, pistachio cream, and the broader flavour language of the Levant and Gulf regions are increasingly finding their way into global kitchens, and rightly so — they are extraordinary.
Making this recipe is also an entry point into ingredients and techniques that will expand your cooking in valuable ways. Once you have made pistachio cream and toasted kataifi, you will find uses for them far beyond this single recipe.
Make a batch. Gift them. Eat them slowly. Film the snap.
Discover more trending plant-based desserts and viral vegan recipes in our Website.