quick vegan dinner

Vegan Lemon Orzo Soup: The Cozy One-Pot Spring Dinner Taking Over Pinterest in 2026

 This vegan lemon orzo soup is bright, cozy, and packed with vegetables. A healthy one-pot dinner ready in 30 minutes that the whole family will love.

There is a particular kind of recipe that exists in the gap between winter soups and summer salads — something bright and fresh, but still warm and comforting, that fits the strange in-between weeks of spring when the evenings are still cool but the mornings smell of something better coming. This vegan lemon orzo soup lives in that gap perfectly.

It appeared on Pinterest’s most-saved board in May 2026 with a description that resonated immediately: cozy, healthy, one-pot, lemony. Those four words map almost exactly to what people are searching for as winter loosens its grip — food that makes them feel nourished without heaviness, food that can be made quickly and without complexity on a weeknight.

The orzo — tiny, rice-shaped pasta — cooks directly in the broth, releasing starch that thickens the soup into something between a broth and a stew. The lemon, added generously at the end, brightens every element and transforms what could be a mild vegetable soup into something that tastes unmistakably vibrant. White beans add protein and creaminess. Fresh dill finishes it with an herbal fragrance that is the soup’s defining note.

Ingredients (Serves 4)

  • 200g orzo pasta
  • 1 can (400g) cannellini beans, drained and rinsed
  • 200g baby spinach
  • 1 medium onion, finely diced
  • 4 garlic cloves, minced
  • 2 medium carrots, diced
  • 2 stalks celery, diced
  • 1.2 litres vegetable stock
  • Zest and juice of 2 large lemons
  • 3 tablespoons olive oil
  • 1 teaspoon dried oregano
  • ½ teaspoon dried thyme
  • ½ teaspoon turmeric (for colour and anti-inflammatory benefit)
  • A large handful of fresh dill, roughly chopped
  • Salt and black pepper to taste
  • Extra olive oil and lemon slices to serve

Method

Step 1: Heat olive oil in a large pot. Add onion, carrots, and celery with a pinch of salt. Cook 8 minutes until softened. Add garlic, oregano, thyme, and turmeric. Cook 1 minute.

Step 2: Pour in vegetable stock. Bring to a boil. Add the orzo and stir well to prevent sticking. Reduce to a steady simmer and cook for 8 minutes, stirring occasionally.

Step 3: Add the cannellini beans. Simmer 3 more minutes until the orzo is tender and the broth has thickened slightly from the released starch.

Step 4: Add the baby spinach and stir until wilted (about 60 seconds). Remove from heat. Stir in the lemon zest, lemon juice, and fresh dill. Season generously with salt and pepper.

Step 5: Serve in deep bowls with an extra drizzle of olive oil, a lemon slice, and additional fresh dill. Crusty bread alongside is strongly encouraged.

Storage note: Orzo absorbs liquid aggressively as it sits. Store soup and cooked orzo separately, or add a generous splash of stock or water when reheating.

Nutritional highlights: Cannellini beans provide 17g protein per cup, folate, and iron. Lemon juice adds vitamin C that significantly improves iron absorption from the plant foods. Turmeric contributes curcumin. Fresh dill adds vitamin K, vitamin C, and antioxidant flavonoids.

Zucchini Pasta with Vibrant Vegan Basil Pesto

The best things you can say about a pasta dish are that it is quick, that it is deeply flavoured, and that it leaves you genuinely satisfied. This zucchini pasta with vegan basil pesto achieves all three with such ease that it has become my most reliable weeknight dinner. From the moment the pasta water goes on to the moment the bowl lands on the table is thirty minutes. The pesto, once you have made it, is a revelation.

Pesto is one of those preparations that most people assume requires Parmesan cheese to taste the way it should. It does not. The cheese provides fat, salt, and umami — all of which can be replicated with nutritional yeast and good-quality salt in a way that is so convincing I have served this to Italian friends without revealing its plant-based nature, and received no complaints. One of them asked for the recipe.

The zucchini in this dish serves two purposes. Sliced into thin ribbons and added at the last moment, it softens gently from the residual heat of the pasta, providing a delicate textural contrast to the firm pasta and a freshness that lifts the richness of the pesto. It also stretches the dish, extending two servings of pasta to four without anyone feeling short-changed.

On Making the Best Pesto

Pesto is a sauce that rewards quality ingredients above all else. It has very few of them, which means each one matters more:

Basil: Use the freshest basil you can find, with large, unblemished leaves. Tired basil produces tired pesto. If your basil has started to wilt, it is still usable, but the flavour will be less vibrant. Fresh is always better.

Olive oil: Use extra-virgin olive oil. This is not the place for a light or mild cooking oil — the flavour of the oil is central to the flavour of the pesto. A grassy, slightly peppery Sicilian or Ligurian oil is ideal.

Nutritional yeast: This is what replaces the Parmesan in terms of flavour function. Two to three tablespoons add a savoury, almost cheesy depth. Do not skip it. Do not substitute.

Pine nuts vs alternatives: Pine nuts are traditional and produce a pesto with a particular richness and sweetness. They are also expensive. Walnuts make an excellent, more economical substitute, producing a slightly earthier pesto that many people prefer. Blanched almonds are another option. Whatever you use, toast them first — even two minutes in a dry pan dramatically improves the flavour.

Ingredients (Serves 4)

For the vegan basil pesto:

  • 60g fresh basil leaves, packed
  • 60g pine nuts (or walnuts), toasted
  • 3 garlic cloves
  • 3 tablespoons nutritional yeast
  • Juice of ½ lemon
  • 120ml extra-virgin olive oil
  • Salt and black pepper to taste

For the pasta:

  • 400g pasta of your choice (linguine, spaghetti, or penne all work well)
  • 3 medium zucchini (courgettes), sliced into thin ribbons with a peeler or mandoline
  • 3 tablespoons olive oil
  • 4 garlic cloves, thinly sliced
  • ½ teaspoon chilli flakes
  • 150g cherry tomatoes, halved
  • 50ml pasta cooking water (reserved before draining)
  • Salt for the pasta water

To serve:

  • Extra nutritional yeast or vegan Parmesan
  • Fresh basil leaves
  • Toasted pine nuts
  • Freshly cracked black pepper
  • Lemon zest

Method

Step 1: Make the Pesto

Toast the pine nuts in a dry pan over medium heat for 2 to 3 minutes, stirring, until lightly golden and fragrant. Watch them carefully — they burn quickly.

Place the basil, toasted pine nuts, garlic, and nutritional yeast in a food processor. Pulse several times until roughly combined. With the processor running, pour in the olive oil in a steady stream until the pesto reaches your preferred consistency — some people like it smooth, others prefer it chunky and textured. Season generously with salt, pepper, and lemon juice. Taste and adjust.

If you do not have a food processor, a blender works, or you can make it the traditional way in a mortar and pestle — starting with the garlic and salt, then adding the nuts, then the basil, and finally incorporating the oil by hand. The mortar and pestle method produces a more textured, more aromatic pesto that is arguably superior to the machine version.

Step 2: Cook the Pasta

Bring a large pot of water to a rolling boil. Season generously with salt — pasta water should taste pleasantly salty, like a mild broth. Cook the pasta according to packet instructions until al dente. Before draining, scoop out at least 100ml of pasta cooking water with a ladle or mug. This starchy water will help the pesto sauce cling to the pasta.

Step 3: Prepare the Zucchini

While the pasta cooks, use a vegetable peeler or mandoline to create thin ribbons from the zucchini. Run the peeler along the length of each courgette, rotating as you go. Stop when you reach the seedy core. The ribbons only need a minute in the pan — they cook through very quickly.

Step 4: Build the Sauce

Heat the olive oil in a wide pan over medium heat. Add the sliced garlic and chilli flakes. Cook gently for one to two minutes until the garlic is just golden — not brown. Add the cherry tomatoes, increase the heat slightly, and cook for three to four minutes until they begin to soften and blister.

Step 5: Combine

Add the drained pasta to the pan. Add two to three tablespoons of the reserved pasta water and stir vigorously — this emulsifies the starchy water with the oil, creating a light sauce that helps the pesto adhere. Add the zucchini ribbons and toss briefly. Remove from heat.

Spoon the pesto over the pasta and toss gently to coat, adding more pasta water if needed to loosen. The heat of the pasta will warm the pesto without cooking it — which is important, as cooking basil intensifies bitterness and dulls the vibrant green colour.

Step 6: Serve

Divide between warmed bowls immediately. Finish with extra nutritional yeast, toasted pine nuts, fresh basil leaves, lemon zest, and plenty of cracked black pepper.

Nutrition

This dish is an excellent source of complex carbohydrates for sustained energy, healthy fats from the olive oil and pine nuts, and plant-based protein and B vitamins from the nutritional yeast. Zucchini is low in calories and high in potassium and vitamin C. Basil, often overlooked nutritionally, provides a meaningful source of vitamin K.

For additional protein, stir in 200g of cooked white beans or chickpeas during step 4, or serve alongside a simple tomato and white bean salad.

Storage

Leftover pasta stores in the refrigerator for up to three days, though the pasta will absorb more pesto as it sits and may benefit from a drizzle of extra olive oil when reheating. Reheat gently in a pan with a splash of water.

The pesto itself stores beautifully. Pour into a clean jar, top with a thin layer of olive oil to prevent oxidation, and refrigerate for up to a week. It also freezes well in ice cube trays — pop the frozen cubes into a bag and use as needed.

Final Thoughts

There are dishes that impress through their complexity, and there are dishes that impress through their simplicity. This pasta belongs firmly in the second category. The pesto is so good on its own terms that it asks very little of the dish around it. Give it good pasta, fresh zucchini, a scattering of cherry tomatoes, and it does everything else itself.

Make the pesto in a larger batch than you need. You will find uses for it every day of the week.


Browse more simple, vibrant plant-based dinners in Website.

Vegan Pad Thai: Authentic Street-Food Flavour at Home

The first time I had truly great pad thai, it was from a street cart in Bangkok, eaten standing up with a plastic fork at ten in the morning, and it changed my understanding of what noodles could be. The balance of flavours was extraordinary — salty, sweet, sour, umami, and the kind of smoky fragrance that comes only from a wok over intense, direct heat.

Recreating that experience at home comes with one honest caveat: your kitchen stove is unlikely to reach the temperatures of a commercial gas burner or street food wok. But that does not mean you cannot make excellent pad thai at home. With the right ingredients, the right technique, and a willingness to cook in small batches over the highest heat your stove can offer, you can produce a dish that captures the essence of the original in a way that is deeply satisfying.

This version is fully plant-based, using tofu as the protein and tamarind paste at the heart of the sauce — because tamarind is not optional in pad thai. It is what gives the dish its characteristic sour-sweet depth that differentiates it from every other noodle dish. If you have not cooked with tamarind before, this recipe is the best possible introduction to it.

The Non-Negotiables of Pad Thai

Before the recipe itself, a brief note on what you absolutely should not compromise on:

Tamarind paste: This is the soul of the sauce. Ketchup is sometimes suggested as a substitute in Western adaptations. It is not a substitute. It is a different dish. Tamarind paste is widely available in Asian grocery stores and most large supermarkets.

Fish sauce alternative: Traditional pad thai uses fish sauce. For a fully vegan version, use a combination of soy sauce and a small amount of seaweed flakes (or nori) to approximate the oceanic depth. There are also dedicated vegan fish sauce products available.

Flat rice noodles: Vermicelli noodles will work in a pinch, but the flat, wide rice noodles — typically labelled as “rice stick noodles” — give the dish its characteristic texture and absorb the sauce more effectively.

Cook in batches: Do not double the recipe and cook it all at once in a single pan. Overcrowded woks steam rather than fry. Cook two servings at a time for the best result.

Ingredients (Serves 4)

For the sauce:

  • 3 tablespoons tamarind paste
  • 3 tablespoons soy sauce or tamari
  • 1 tablespoon vegan fish sauce (or 1 tablespoon soy + ½ teaspoon nori flakes)
  • 2 tablespoons coconut sugar or brown sugar
  • 1 tablespoon rice vinegar

For the noodles and protein:

  • 300g flat rice noodles
  • 400g firm tofu, pressed and cubed
  • 3 tablespoons neutral oil (divided)
  • 2 tablespoons cornstarch (for the tofu)
  • 4 garlic cloves, thinly sliced
  • 4 spring onions, white and green parts separated
  • 150g bean sprouts
  • 2 tablespoons soy sauce (for marinating tofu)

To serve:

  • 4 tablespoons roasted peanuts, roughly crushed
  • 2 limes, cut into wedges
  • Fresh coriander
  • Dried chilli flakes
  • Extra bean sprouts

Method

Step 1: Soak the Noodles

Soak the flat rice noodles in cold water for 30 minutes, or in warm water for 15 minutes, until pliable but not fully cooked — they should be flexible but still have significant resistance when you bite one. Drain and set aside. They will finish cooking in the wok.

Step 2: Make the Sauce

Combine the tamarind paste, soy sauce, vegan fish sauce, coconut sugar, and rice vinegar in a small bowl. Whisk until the sugar has dissolved. Taste and adjust — it should be a bold combination of salty, sour, and sweet. Set aside within reach of the stove.

Step 3: Prepare the Tofu

Press the tofu firmly between clean tea towels for at least 20 minutes. Cut into 1.5cm cubes. Toss with 2 tablespoons of soy sauce, then coat in cornstarch. Heat 1.5 tablespoons of neutral oil in a wide pan or wok over high heat. Add the tofu in a single layer and cook without moving for 3 to 4 minutes until deeply golden. Turn and cook for another 2 to 3 minutes until crisp on all sides. Remove and set aside.

Step 4: Cook the Pad Thai (in batches)

Heat the remaining oil in the wok over the highest possible heat. Add half the garlic and the white parts of the spring onions. Stir-fry for 30 seconds. Add half the drained noodles and half the sauce. Toss continuously using tongs for 2 to 3 minutes — the noodles should absorb the sauce and develop some caramelisation on the edges where they contact the hot pan. Add half the tofu and half the bean sprouts. Toss for one more minute. Remove to a serving plate and cook the second batch.

Step 5: Serve

Pile the pad thai onto plates and top with crushed peanuts, fresh coriander, the green parts of the spring onions, and a wedge of lime. Serve chilli flakes on the side for those who want extra heat.

Pressing Tofu: Why It Matters

The difference between soft, spongy tofu and crispy, golden tofu is almost entirely about moisture removal. Tofu is sold packed in water, and that water must be removed before the tofu can brown properly. Even ten minutes of pressing between weighted tea towels makes a significant difference. Thirty minutes is better. If you have a tofu press, use it — they are inexpensive and genuinely useful.

Once pressed, the cornstarch coating creates a thin, crispy crust that holds up to the sauce without becoming soggy. Do not skip it.

The Wok Technique

Professional pad thai is cooked with a technique called “wok hei” — a Cantonese term that translates roughly as “breath of the wok.” It refers to the complex, slightly smoky flavour that high-heat cooking imparts. You cannot fully replicate wok hei on a home stove, but you can get close by ensuring your wok or pan is ripping hot before anything goes in, cooking in small batches to maintain temperature, and working quickly with confidence.

A carbon steel wok is worth the investment if you cook stir-fries regularly. It heats faster and retains heat better than most non-stick pans, and it will last a lifetime with proper care.

Nutritional Profile

Tofu is among the most complete plant-based proteins available, containing all nine essential amino acids in meaningful quantities. A 100g serving provides approximately 8 grams of protein, along with calcium, iron, and manganese. Combined with the energy from the rice noodles and the micronutrients from the fresh vegetables, this is a nutritionally balanced meal that genuinely satisfies.

Peanuts add healthy monounsaturated fats, additional protein, and a meaningful amount of niacin and folate. Bean sprouts contribute vitamin C and a satisfying crunch.

Final Thoughts

Pad thai done well is one of the most exciting things you can cook in a home kitchen. It is fast, intensely flavoured, and rewards confidence. Once you have made it two or three times and found your rhythm with the sauce and the heat, it becomes a dish you can pull together faster than takeaway can be delivered.

Make the sauce in advance. Press the tofu the night before. Have everything ready at the stove. Then cook it fast, eat it immediately, and enjoy every bite.


Browse more vibrant plant-based recipes in our Website.

Thai Peanut Noodles: The 20-Minute Vegan Dinner That Tastes Like Takeaway

Some recipes exist to remind you that eating well does not have to be complicated. These Thai peanut noodles are perhaps the best example I know of that truth. They come together in under twenty minutes, require minimal equipment, and produce a bowl of food so rich, so balanced, and so quietly addictive that I have made them more times than I can reasonably count.

The peanut sauce is the centrepiece. It is bold without being heavy, sweet without being cloying, and carries just enough heat to keep you reaching for the next mouthful. Tossed through rice noodles and piled with crisp, fresh vegetables, it is the kind of dish that proves vegan food at its best is not a substitute for anything — it is simply excellent cooking in its own right.

This recipe is also almost infinitely adaptable. Whatever vegetables you have in your refrigerator — bell peppers, broccoli, edamame, cucumber, shredded carrot — they all belong here. The sauce is the constant; everything else is a variable.

The Anatomy of a Great Peanut Sauce

A great peanut sauce has five elements in balance: fat, salt, acid, sweetness, and heat. Peanut butter provides the fat and, together with soy sauce, the salt. Fresh lime juice delivers the acid. Maple syrup or coconut sugar brings the sweetness. Fresh chilli or chilli flakes provide the heat. Garlic and ginger thread through the whole thing, giving it depth and fragrance.

The ratio matters, but so does your palate — and that is why tasting as you go is not optional here, it is the recipe. Start with the proportions below, then adjust. A touch more lime if it needs brightness. A little more soy if it feels flat. An extra teaspoon of chilli if you want more fire. The sauce should taste almost too intense on its own, because once tossed through noodles and vegetables, it mellows significantly.

One more thing: use warm water to thin the sauce rather than cold. Warm water blends more easily into the peanut butter and prevents the sauce from seizing up.

Ingredients (Serves 4)

For the peanut sauce:

  • 5 tablespoons natural peanut butter (smooth or crunchy)
  • 3 tablespoons soy sauce or tamari
  • 2 tablespoons fresh lime juice
  • 1½ tablespoons maple syrup or coconut sugar
  • 1 tablespoon rice vinegar
  • 2 teaspoons sesame oil
  • 3 garlic cloves, finely minced or grated
  • 1 tablespoon fresh ginger, grated
  • 1 to 2 teaspoons chilli flakes or sambal oelek (to taste)
  • 4 to 6 tablespoons warm water (to loosen)

For the noodles and vegetables:

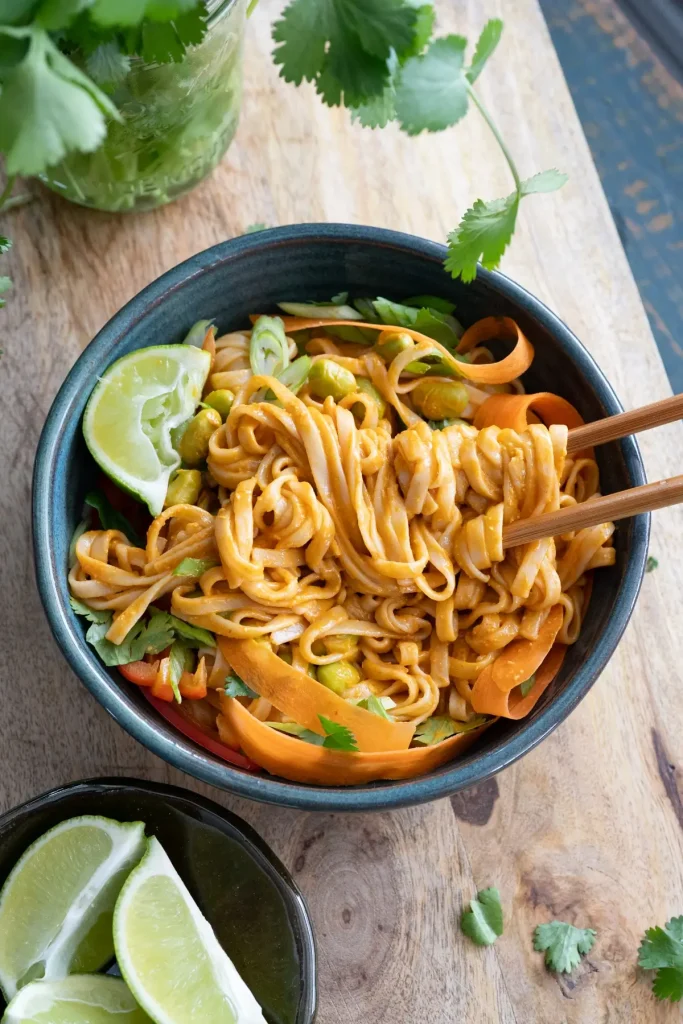
  • 300g rice noodles (flat or vermicelli)
  • 1 red bell pepper, thinly sliced
  • 2 medium carrots, julienned or grated
  • 1 cucumber, halved and thinly sliced
  • 150g edamame beans (shelled, thawed if frozen)
  • 4 spring onions, thinly sliced
  • A large handful of fresh coriander
  • A large handful of fresh mint
  • 2 tablespoons sesame seeds, toasted

Optional toppings:

  • Crushed roasted peanuts
  • Extra lime wedges
  • Crispy tofu or tempeh
  • Thinly sliced red chilli

Method

Step 1: Make the Peanut Sauce

Combine the peanut butter, soy sauce, lime juice, maple syrup, rice vinegar, sesame oil, garlic, ginger, and chilli flakes in a medium bowl. Whisk together until smooth — it will look thick and slightly seized at first, but keep whisking. Add warm water, one tablespoon at a time, until you reach a pourable, coating consistency. Taste and adjust any element you feel is out of balance. Set aside.

Step 2: Cook the Noodles

Cook the rice noodles according to the packet instructions — most flat rice noodles require soaking in boiling water for 5 to 8 minutes rather than active boiling. Once tender, drain and rinse under cold water to stop the cooking and prevent sticking. If the noodles are very long, you can snip them roughly with kitchen scissors for easier tossing.

Step 3: Prepare the Vegetables

While the noodles soak, prepare all your vegetables. This is a raw-vegetable dish, so everything is sliced or grated for maximum freshness. The crunch of the carrot and bell pepper against the tender noodles and creamy sauce is part of what makes this dish so appealing.

Step 4: Combine

Place the drained noodles in a large bowl. Pour over most of the peanut sauce and toss well to coat every strand. Add the carrots, bell pepper, edamame, spring onions, coriander, and mint. Toss again gently, adding more sauce if needed. The noodles absorb the sauce quickly, so be generous.

Step 5: Serve

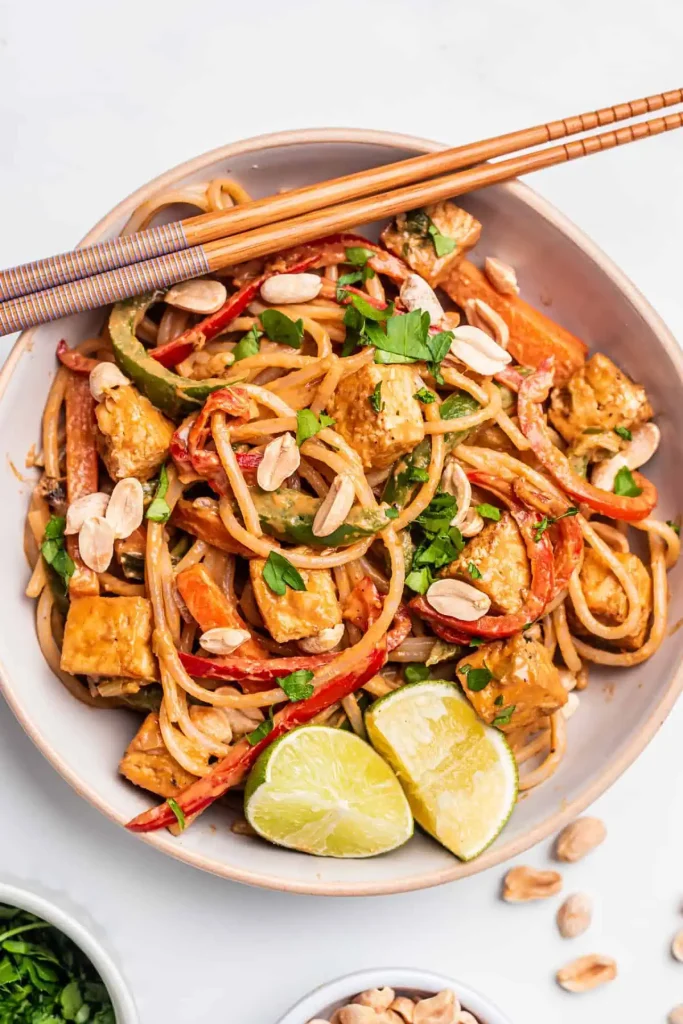
Divide between bowls and garnish with toasted sesame seeds, crushed peanuts, fresh lime wedges, and any additional toppings. Serve immediately, or refrigerate and serve cold as a noodle salad — it works beautifully both ways.

Making it a Full Meal: Adding Protein

The noodles as described are a satisfying meal for most people, but if you want to add more protein, crispy tofu is the natural companion.

To make crispy tofu: press a block of firm tofu between clean tea towels for at least 20 minutes to remove excess moisture. Cut into cubes, toss in a little soy sauce and cornstarch, and pan-fry in a tablespoon of neutral oil over high heat until golden and crisp on all sides. Add directly to the bowl.

Tempeh, marinated and pan-fried, is another excellent option. Its firmer, slightly nutty character pairs especially well with the intensity of the peanut sauce.

Health Benefits Worth Noting

Despite tasting like an indulgence, this dish is nutritionally well-rounded. Natural peanut butter provides protein, healthy monounsaturated fats, vitamin E, and magnesium. The raw vegetables contribute a range of vitamins, antioxidants, and dietary fibre. Fresh herbs — particularly coriander — provide meaningful amounts of vitamin K and trace minerals.

Rice noodles are naturally gluten-free and easy to digest, making this a dish that is accessible to those with gluten sensitivities. Use tamari instead of standard soy sauce to ensure the dish is fully gluten-free.

The sesame oil, beyond flavour, provides lignans and healthy polyunsaturated fats. It is one of those ingredients that earns its place nutritionally as well as flavourwise.

Storage

The peanut sauce can be made several days in advance and stored in a sealed jar in the refrigerator, where it will keep for up to a week. The assembled noodles are best eaten on the day they are made, as the noodles continue to absorb the sauce and can become clumped if stored overnight. If making ahead, store the sauce, noodles, and vegetables separately and combine just before serving.

A Recipe for All Occasions

What I appreciate most about this recipe is that it requires no special occasion. It belongs equally at a dinner party — served in a large bowl in the centre of the table for people to help themselves — and on a Tuesday evening when you open the refrigerator, see a wilting bell pepper and some leftover noodles, and decide something good can still come from what is there.

That versatility, more than anything else, is what makes this a staple recipe. It adapts to you, to your kitchen, and to whatever happens to be in your vegetable drawer. And it always tastes like someone tried.


Discover more quick and delicious plant-based meals in our Website