vegan Italian food

Zucchini Pasta with Vibrant Vegan Basil Pesto

The best things you can say about a pasta dish are that it is quick, that it is deeply flavoured, and that it leaves you genuinely satisfied. This zucchini pasta with vegan basil pesto achieves all three with such ease that it has become my most reliable weeknight dinner. From the moment the pasta water goes on to the moment the bowl lands on the table is thirty minutes. The pesto, once you have made it, is a revelation.

Pesto is one of those preparations that most people assume requires Parmesan cheese to taste the way it should. It does not. The cheese provides fat, salt, and umami — all of which can be replicated with nutritional yeast and good-quality salt in a way that is so convincing I have served this to Italian friends without revealing its plant-based nature, and received no complaints. One of them asked for the recipe.

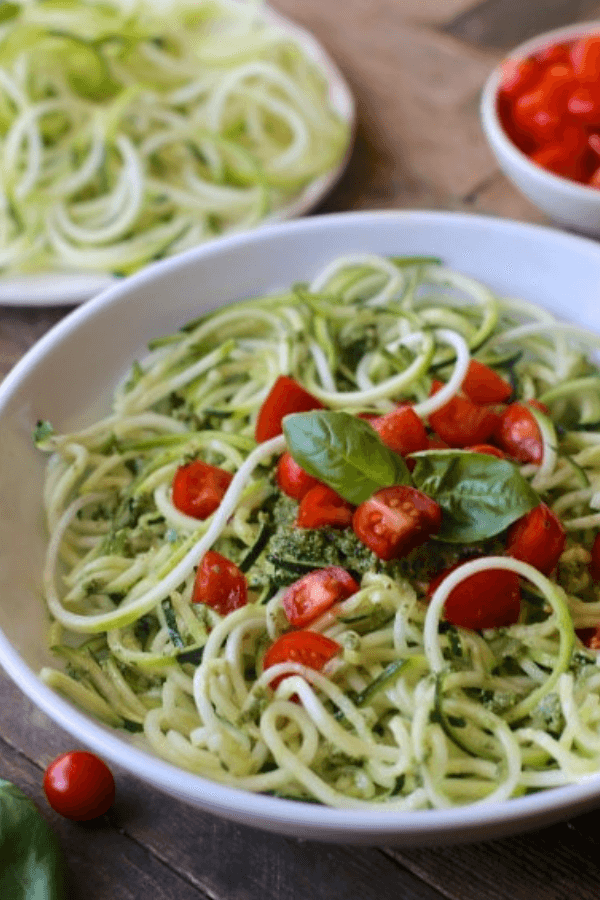
The zucchini in this dish serves two purposes. Sliced into thin ribbons and added at the last moment, it softens gently from the residual heat of the pasta, providing a delicate textural contrast to the firm pasta and a freshness that lifts the richness of the pesto. It also stretches the dish, extending two servings of pasta to four without anyone feeling short-changed.

On Making the Best Pesto

Pesto is a sauce that rewards quality ingredients above all else. It has very few of them, which means each one matters more:

Basil: Use the freshest basil you can find, with large, unblemished leaves. Tired basil produces tired pesto. If your basil has started to wilt, it is still usable, but the flavour will be less vibrant. Fresh is always better.

Olive oil: Use extra-virgin olive oil. This is not the place for a light or mild cooking oil — the flavour of the oil is central to the flavour of the pesto. A grassy, slightly peppery Sicilian or Ligurian oil is ideal.

Nutritional yeast: This is what replaces the Parmesan in terms of flavour function. Two to three tablespoons add a savoury, almost cheesy depth. Do not skip it. Do not substitute.

Pine nuts vs alternatives: Pine nuts are traditional and produce a pesto with a particular richness and sweetness. They are also expensive. Walnuts make an excellent, more economical substitute, producing a slightly earthier pesto that many people prefer. Blanched almonds are another option. Whatever you use, toast them first — even two minutes in a dry pan dramatically improves the flavour.

Ingredients (Serves 4)

For the vegan basil pesto:

  • 60g fresh basil leaves, packed
  • 60g pine nuts (or walnuts), toasted
  • 3 garlic cloves
  • 3 tablespoons nutritional yeast
  • Juice of ½ lemon
  • 120ml extra-virgin olive oil
  • Salt and black pepper to taste

For the pasta:

  • 400g pasta of your choice (linguine, spaghetti, or penne all work well)
  • 3 medium zucchini (courgettes), sliced into thin ribbons with a peeler or mandoline
  • 3 tablespoons olive oil
  • 4 garlic cloves, thinly sliced
  • ½ teaspoon chilli flakes
  • 150g cherry tomatoes, halved
  • 50ml pasta cooking water (reserved before draining)
  • Salt for the pasta water

To serve:

  • Extra nutritional yeast or vegan Parmesan
  • Fresh basil leaves
  • Toasted pine nuts
  • Freshly cracked black pepper
  • Lemon zest

Method

Step 1: Make the Pesto

Toast the pine nuts in a dry pan over medium heat for 2 to 3 minutes, stirring, until lightly golden and fragrant. Watch them carefully — they burn quickly.

Place the basil, toasted pine nuts, garlic, and nutritional yeast in a food processor. Pulse several times until roughly combined. With the processor running, pour in the olive oil in a steady stream until the pesto reaches your preferred consistency — some people like it smooth, others prefer it chunky and textured. Season generously with salt, pepper, and lemon juice. Taste and adjust.

If you do not have a food processor, a blender works, or you can make it the traditional way in a mortar and pestle — starting with the garlic and salt, then adding the nuts, then the basil, and finally incorporating the oil by hand. The mortar and pestle method produces a more textured, more aromatic pesto that is arguably superior to the machine version.

Step 2: Cook the Pasta

Bring a large pot of water to a rolling boil. Season generously with salt — pasta water should taste pleasantly salty, like a mild broth. Cook the pasta according to packet instructions until al dente. Before draining, scoop out at least 100ml of pasta cooking water with a ladle or mug. This starchy water will help the pesto sauce cling to the pasta.

Step 3: Prepare the Zucchini

While the pasta cooks, use a vegetable peeler or mandoline to create thin ribbons from the zucchini. Run the peeler along the length of each courgette, rotating as you go. Stop when you reach the seedy core. The ribbons only need a minute in the pan — they cook through very quickly.

Step 4: Build the Sauce

Heat the olive oil in a wide pan over medium heat. Add the sliced garlic and chilli flakes. Cook gently for one to two minutes until the garlic is just golden — not brown. Add the cherry tomatoes, increase the heat slightly, and cook for three to four minutes until they begin to soften and blister.

Step 5: Combine

Add the drained pasta to the pan. Add two to three tablespoons of the reserved pasta water and stir vigorously — this emulsifies the starchy water with the oil, creating a light sauce that helps the pesto adhere. Add the zucchini ribbons and toss briefly. Remove from heat.

Spoon the pesto over the pasta and toss gently to coat, adding more pasta water if needed to loosen. The heat of the pasta will warm the pesto without cooking it — which is important, as cooking basil intensifies bitterness and dulls the vibrant green colour.

Step 6: Serve

Divide between warmed bowls immediately. Finish with extra nutritional yeast, toasted pine nuts, fresh basil leaves, lemon zest, and plenty of cracked black pepper.

Nutrition

This dish is an excellent source of complex carbohydrates for sustained energy, healthy fats from the olive oil and pine nuts, and plant-based protein and B vitamins from the nutritional yeast. Zucchini is low in calories and high in potassium and vitamin C. Basil, often overlooked nutritionally, provides a meaningful source of vitamin K.

For additional protein, stir in 200g of cooked white beans or chickpeas during step 4, or serve alongside a simple tomato and white bean salad.

Storage

Leftover pasta stores in the refrigerator for up to three days, though the pasta will absorb more pesto as it sits and may benefit from a drizzle of extra olive oil when reheating. Reheat gently in a pan with a splash of water.

The pesto itself stores beautifully. Pour into a clean jar, top with a thin layer of olive oil to prevent oxidation, and refrigerate for up to a week. It also freezes well in ice cube trays — pop the frozen cubes into a bag and use as needed.

Final Thoughts

There are dishes that impress through their complexity, and there are dishes that impress through their simplicity. This pasta belongs firmly in the second category. The pesto is so good on its own terms that it asks very little of the dish around it. Give it good pasta, fresh zucchini, a scattering of cherry tomatoes, and it does everything else itself.

Make the pesto in a larger batch than you need. You will find uses for it every day of the week.


Browse more simple, vibrant plant-based dinners in Website.

The Secret to a Perfect Vegan Mushroom Risotto (That Nobody Will Believe Is Dairy-Free)

Risotto has a reputation for being difficult. Chefs on cooking competitions treat it with an almost reverent caution, and home cooks often sidestep it entirely, assuming it requires either technical skill they do not have or constant, anxious supervision. I want to challenge both of those assumptions — because risotto, at its core, is simply a technique of patience and attention, and once you understand what you are trying to achieve, it becomes one of the most enjoyable things to cook.

This vegan mushroom risotto is rich, deeply savoury, and so satisfying that it has become the dish I make when I want to genuinely impress someone. The secret is layering umami — through a combination of dried porcini mushrooms, fresh mixed mushrooms, good vegetable stock, and a generous finish of nutritional yeast that gives the dish that characteristic savoury depth typically associated with Parmesan.

You do not need dairy to make a great risotto. You need good stock, the right rice, and enough time to stir.

A Note on the Rice

Risotto rice is not interchangeable with regular long-grain rice. The dish depends on the starch released from short-grain varieties — specifically Arborio, Carnaroli, or Vialone Nano — to create that creamy, flowing consistency. Arborio is the most widely available and works beautifully. Do not rinse the rice before cooking; the surface starch is precisely what you want to preserve.

Carnaroli, if you can find it, is worth seeking out. It is slightly firmer, releases starch more gradually, and gives you a longer window between perfect risotto and overcooked. It is the variety most used by Italian chefs for good reason.

The Role of Dried Mushrooms

Dried porcini mushrooms are one of the most underrated ingredients in a home kitchen. When soaked in hot water, they release a deeply flavoured, almost meaty liquid that works as a ready-made umami base. In this recipe, that soaking liquid is added directly to the stock, infusing every ladle with concentrated mushroom flavour.

Do not skip this ingredient. It is inexpensive, keeps for months in a sealed jar, and elevates the final dish in a way that fresh mushrooms alone simply cannot replicate.

Ingredients (Serves 4)

  • 300g Arborio or Carnaroli rice
  • 500g mixed fresh mushrooms (chestnut, portobello, shiitake — any combination)
  • 25g dried porcini mushrooms
  • 1.2 litres good-quality vegetable stock, kept warm
  • 1 medium onion, very finely diced
  • 4 garlic cloves, minced
  • 150ml dry white wine (or an additional 150ml stock)
  • 3 tablespoons olive oil
  • 2 tablespoons vegan butter
  • 4 tablespoons nutritional yeast
  • 1 tablespoon fresh thyme leaves (or 1 teaspoon dried)
  • 1 tablespoon soy sauce
  • Salt and black pepper to taste
  • Fresh flat-leaf parsley, to serve
  • Truffle oil, to serve (optional but excellent)

Method

Step 1: Rehydrate the Porcini

Place the dried porcini mushrooms in a heatproof bowl and pour over 300ml of boiling water. Leave to soak for at least 20 minutes. Once soaked, remove the mushrooms, squeezing out any excess liquid, and chop them roughly. Pour the soaking liquid through a fine sieve or muslin cloth into your warm vegetable stock — this becomes the flavoured base for your risotto. Discard any grit left behind.

Step 2: Cook the Fresh Mushrooms

Heat one tablespoon of olive oil in a wide pan over high heat. Add the fresh mushrooms and cook without stirring for two to three minutes — you want them to develop colour rather than steam. Season with salt and pepper, add the soy sauce, and toss briefly. Remove from the pan and set aside. High heat and patience are the keys to golden rather than grey mushrooms.

Step 3: Begin the Risotto

In a wide, heavy-bottomed pan, heat the remaining two tablespoons of olive oil over medium heat. Add the onion and a pinch of salt. Cook gently for 8 to 10 minutes until soft and translucent. Add the garlic and thyme and cook for one more minute. Add the rehydrated porcini mushrooms and stir to combine.

Step 4: Toast the Rice

Add the rice to the pan and stir constantly for two minutes until each grain is well coated in the oil and begins to turn slightly translucent at the edges. This toasting step is important — it helps the rice maintain structure through the long cooking process.

Step 5: Add the Wine

Pour in the white wine and stir constantly until it has been almost entirely absorbed. The alcohol will evaporate quickly, leaving behind a pleasant acidity that balances the richness of the final dish.

Step 6: Add the Stock, Ladle by Ladle

This is the step that defines risotto. Add the warm stock one ladleful at a time, stirring frequently and waiting until each addition is almost completely absorbed before adding the next. This gradual process coaxes the starch from the rice, building the creamy consistency that characterises a great risotto. The entire process takes around 18 to 20 minutes over medium heat. Taste the rice as you go — it should be tender with just a slight bite at the centre when done.

Step 7: Finish and Serve

Remove the pan from heat. Stir in the vegan butter and nutritional yeast vigorously — this technique, called mantecatura in Italian cooking, is what gives risotto its final glossy, creamy texture. Fold in the reserved sautéed mushrooms. Taste and season generously with salt and pepper.

Serve immediately in warm bowls, finished with fresh parsley and a small drizzle of truffle oil if using.

Nutritional Highlights

Mushrooms are among the most nutritionally interesting ingredients in plant-based cooking. They are one of the few non-animal sources of vitamin D, particularly when exposed to sunlight — and shiitake mushrooms are a valuable source of B vitamins and zinc. Combined with the protein from nutritional yeast and the complex carbohydrates from the rice, this dish offers a balanced and genuinely nourishing meal.

Nutritional yeast deserves particular mention. Beyond its savoury, almost cheesy flavour, it is a complete protein and often fortified with vitamin B12 — a nutrient of particular importance for those following a fully plant-based diet. Two tablespoons provides a meaningful contribution to daily requirements.

Serving Suggestions

This risotto is complete as a standalone dish but pairs well with a simple green salad dressed with lemon and olive oil. A glass of the same dry white wine used in cooking is the natural accompaniment.

For a special occasion, shave thin slices of fresh black truffle over the top — it transforms the dish into something genuinely extraordinary. A small drizzle of good truffle oil achieves a similar effect at a fraction of the cost.

Make-Ahead Tips

Risotto is best served immediately, but if you are cooking for a dinner party and want to manage your time, you can cook the risotto to about 75 percent done — around 14 minutes of stock addition — and then spread it out on a baking tray to cool and halt the cooking. When ready to serve, reheat in the pan with an additional ladle or two of warm stock and finish as directed. This technique is widely used in restaurant kitchens and works extremely well.

Leftover risotto makes outstanding risotto cakes the following day. Form cold risotto into patties, coat lightly in breadcrumbs, and pan-fry in a little oil until golden on both sides. They are arguably even better than the original.

Final Thoughts

What this recipe ultimately asks of you is presence — a willingness to stand at the stove, stir, observe, and adjust. In an era of multitasking and distraction, there is something genuinely therapeutic about a dish that demands your full attention for twenty minutes. The risotto becomes better for your focus, and so, in some small way, do you.

Make it on a quiet evening when you have time to enjoy the process. It will reward you.


Explore more comforting plant-based recipes in our Website.