vegan comfort food

Sweet Potato and Black Bean Enchiladas: A Vegan Comfort Food Worth Making Every Week

There are certain meals that achieve something rare — they are simultaneously easy enough for a busy Wednesday evening and impressive enough to serve to guests on a weekend. These sweet potato and black bean enchiladas fall squarely into that category. They are saucy, slightly smoky, generously filled, and topped with a homemade red enchilada sauce that genuinely makes the dish.

I want to be honest about something: the enchilada sauce makes or breaks this recipe. Tinned enchilada sauce is perfectly serviceable, and on a time-pressed evening it is a completely reasonable shortcut. But the homemade version — which takes only fifteen minutes and uses ingredients most kitchens already stock — elevates the dish from good to genuinely memorable. I have included both options below, and you can make your own judgment.

What draws me back to this recipe regularly is how well it reheats. Make a tray on Sunday evening, and you have effortless lunches through the week. The flavours deepen overnight, the filling becomes even more tender, and the sauce settles into the tortillas in a way that is deeply satisfying. It is the kind of cooking that rewards you twice.

On the Filling

Sweet potato and black beans are a partnership built on complementary strengths. Sweet potato brings natural sweetness, a creamy texture, and a vibrant orange colour that makes the filling visually appealing. Black beans contribute earthy, robust protein and a firmness that prevents the filling from becoming stodgy. Together, seasoned with cumin, chilli, and smoked paprika, they create a filling that is layered, complex, and anything but one-dimensional.

The key to the best filling is roasting the sweet potato rather than boiling it. Roasting concentrates its natural sugars, adds caramelised edges, and gives the filling a textural interest that boiled sweet potato simply cannot match. It takes a little longer, but the difference is worth it.

Ingredients (Serves 4–6, approximately 10 enchiladas)

For the filling:

  • 2 medium sweet potatoes, peeled and diced into 1cm cubes
  • 2 cans (800g) black beans, drained and rinsed
  • 1 medium onion, finely diced
  • 3 garlic cloves, minced
  • 1 can (200g) sweetcorn, drained
  • 1 red bell pepper, diced
  • 2 teaspoons ground cumin
  • 1½ teaspoons smoked paprika
  • 1 teaspoon chilli powder
  • Salt and pepper to taste
  • 2 tablespoons olive oil
  • A handful of fresh coriander

For the homemade enchilada sauce:

  • 1 can (400g) chopped tomatoes
  • 2 tablespoons tomato paste
  • 2 teaspoons ground cumin
  • 1½ teaspoons smoked paprika
  • 1 teaspoon chilli powder
  • 1 teaspoon garlic powder
  • 1 teaspoon onion powder
  • 1 tablespoon olive oil
  • 200ml vegetable stock
  • Salt to taste

To assemble:

  • 10 medium flour tortillas
  • Vegan cheese, grated (optional)
  • Sliced avocado, lime, and coriander to serve

Method

Step 1: Roast the Sweet Potato

Preheat your oven to 200°C (180°C fan). Toss the diced sweet potato with one tablespoon of olive oil, a pinch of cumin, salt, and pepper. Spread in a single layer on a lined baking tray. Roast for 25 minutes until tender and lightly caramelised at the edges. Remove from the oven and set aside. Keep the oven on.

Step 2: Make the Enchilada Sauce

While the sweet potato roasts, heat the olive oil in a saucepan over medium heat. Add the tomato paste and cook for two minutes, stirring, to caramelise it slightly. Add the spices — cumin, smoked paprika, chilli powder, garlic powder, onion powder — and stir for one minute. Add the chopped tomatoes and vegetable stock. Simmer for 10 minutes, stirring occasionally, until the sauce has thickened and the flavours have come together. Taste and adjust seasoning. Blend briefly with an immersion blender for a smoother consistency, if preferred.

Step 3: Cook the Filling

Heat the remaining tablespoon of oil in a large pan over medium heat. Add the onion and cook for 6 to 7 minutes until softened. Add the garlic, red pepper, cumin, smoked paprika, and chilli powder. Cook for two more minutes. Add the black beans and sweetcorn. Stir to combine and season generously. Fold in the roasted sweet potato gently, keeping some pieces intact for texture. Add the fresh coriander.

Step 4: Assemble

Spread a thin layer of enchilada sauce across the bottom of a large baking dish. Warm the tortillas briefly in a dry pan or microwave — this makes them more pliable and less likely to crack when rolled. Place a generous spoonful of filling along the centre of each tortilla, roll firmly, and place seam-side down in the dish. Repeat until all filling and tortillas are used.

Pour the remaining enchilada sauce over the top, spreading it to cover the tortillas completely. Sprinkle with grated vegan cheese if using.

Step 5: Bake

Bake in the preheated oven for 20 to 25 minutes until the sauce is bubbling and the tops are lightly golden. Allow to rest for five minutes before serving.

Step 6: Serve

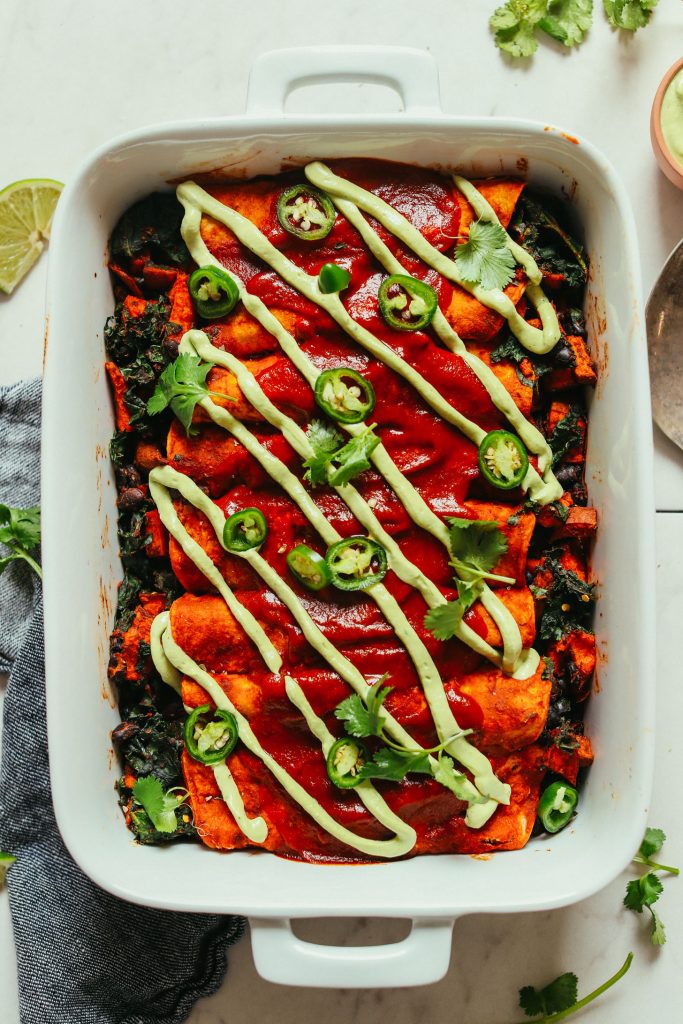
Serve straight from the dish, topped with sliced avocado, a squeeze of lime, and fresh coriander. A simple shredded lettuce salad alongside cuts through the richness beautifully.

Nutritional Information

This dish is a nutritional powerhouse in the most unassuming way. Sweet potatoes are rich in beta-carotene — the precursor to vitamin A — which supports immune function and skin health. They are also a good source of vitamin C, potassium, and dietary fibre. Black beans provide approximately 15 grams of protein and 15 grams of fibre per cup, making them one of the most valuable ingredients in plant-based cooking.

Together, this meal provides a substantial amount of complex carbohydrates for sustained energy, plant-based protein for muscle maintenance, and micronutrients that support overall health. It is the kind of meal you feel as good eating as you feel making it.

Storage and Meal Prep

These enchiladas store exceptionally well. Cover the baking dish tightly with foil and refrigerate for up to four days. Reheat individual portions in the microwave or return the entire dish to a 180°C oven for 15 minutes. Add a small splash of water before reheating to loosen the sauce if needed.

To freeze, assemble the enchiladas completely, including the sauce, but do not bake. Cover tightly with foil and freeze for up to three months. Bake from frozen at 180°C for 40 to 45 minutes, or thaw overnight in the refrigerator and bake for the usual 20 to 25 minutes.

Variations

Add greens: A large handful of spinach or finely chopped kale stirred into the filling at the last moment adds colour and nutrition without changing the flavour profile significantly.

Make it spicier: Add one or two finely diced chipotle peppers in adobo sauce to the enchilada sauce for a deeper, smokier heat.

Use corn tortillas: For a more traditional preparation and a naturally gluten-free version, use corn tortillas instead of flour. Warm them well before rolling to prevent cracking, and work quickly.

Add cashew cream: A drizzle of blended cashew cream over the finished enchiladas adds a luxurious richness and makes the dish feel especially indulgent.

Final Thoughts

What this recipe does well — and what I think sets it apart from a lot of plant-based cooking — is that it does not ask you to pretend. It does not try to be meat. It is simply a deeply flavourful, genuinely satisfying dish built on the merits of its own ingredients. The sweet potato is there because it belongs. The black beans are there because they work. The sauce ties everything together because someone took fifteen minutes to make it properly.

That is cooking at its most honest, and it is the kind of cooking that always tastes best.


Try more hearty plant-based dinner recipes in our website

The Secret to a Perfect Vegan Mushroom Risotto (That Nobody Will Believe Is Dairy-Free)

Risotto has a reputation for being difficult. Chefs on cooking competitions treat it with an almost reverent caution, and home cooks often sidestep it entirely, assuming it requires either technical skill they do not have or constant, anxious supervision. I want to challenge both of those assumptions — because risotto, at its core, is simply a technique of patience and attention, and once you understand what you are trying to achieve, it becomes one of the most enjoyable things to cook.

This vegan mushroom risotto is rich, deeply savoury, and so satisfying that it has become the dish I make when I want to genuinely impress someone. The secret is layering umami — through a combination of dried porcini mushrooms, fresh mixed mushrooms, good vegetable stock, and a generous finish of nutritional yeast that gives the dish that characteristic savoury depth typically associated with Parmesan.

You do not need dairy to make a great risotto. You need good stock, the right rice, and enough time to stir.

A Note on the Rice

Risotto rice is not interchangeable with regular long-grain rice. The dish depends on the starch released from short-grain varieties — specifically Arborio, Carnaroli, or Vialone Nano — to create that creamy, flowing consistency. Arborio is the most widely available and works beautifully. Do not rinse the rice before cooking; the surface starch is precisely what you want to preserve.

Carnaroli, if you can find it, is worth seeking out. It is slightly firmer, releases starch more gradually, and gives you a longer window between perfect risotto and overcooked. It is the variety most used by Italian chefs for good reason.

The Role of Dried Mushrooms

Dried porcini mushrooms are one of the most underrated ingredients in a home kitchen. When soaked in hot water, they release a deeply flavoured, almost meaty liquid that works as a ready-made umami base. In this recipe, that soaking liquid is added directly to the stock, infusing every ladle with concentrated mushroom flavour.

Do not skip this ingredient. It is inexpensive, keeps for months in a sealed jar, and elevates the final dish in a way that fresh mushrooms alone simply cannot replicate.

Ingredients (Serves 4)

  • 300g Arborio or Carnaroli rice
  • 500g mixed fresh mushrooms (chestnut, portobello, shiitake — any combination)
  • 25g dried porcini mushrooms
  • 1.2 litres good-quality vegetable stock, kept warm
  • 1 medium onion, very finely diced
  • 4 garlic cloves, minced
  • 150ml dry white wine (or an additional 150ml stock)
  • 3 tablespoons olive oil
  • 2 tablespoons vegan butter
  • 4 tablespoons nutritional yeast
  • 1 tablespoon fresh thyme leaves (or 1 teaspoon dried)
  • 1 tablespoon soy sauce
  • Salt and black pepper to taste
  • Fresh flat-leaf parsley, to serve
  • Truffle oil, to serve (optional but excellent)

Method

Step 1: Rehydrate the Porcini

Place the dried porcini mushrooms in a heatproof bowl and pour over 300ml of boiling water. Leave to soak for at least 20 minutes. Once soaked, remove the mushrooms, squeezing out any excess liquid, and chop them roughly. Pour the soaking liquid through a fine sieve or muslin cloth into your warm vegetable stock — this becomes the flavoured base for your risotto. Discard any grit left behind.

Step 2: Cook the Fresh Mushrooms

Heat one tablespoon of olive oil in a wide pan over high heat. Add the fresh mushrooms and cook without stirring for two to three minutes — you want them to develop colour rather than steam. Season with salt and pepper, add the soy sauce, and toss briefly. Remove from the pan and set aside. High heat and patience are the keys to golden rather than grey mushrooms.

Step 3: Begin the Risotto

In a wide, heavy-bottomed pan, heat the remaining two tablespoons of olive oil over medium heat. Add the onion and a pinch of salt. Cook gently for 8 to 10 minutes until soft and translucent. Add the garlic and thyme and cook for one more minute. Add the rehydrated porcini mushrooms and stir to combine.

Step 4: Toast the Rice

Add the rice to the pan and stir constantly for two minutes until each grain is well coated in the oil and begins to turn slightly translucent at the edges. This toasting step is important — it helps the rice maintain structure through the long cooking process.

Step 5: Add the Wine

Pour in the white wine and stir constantly until it has been almost entirely absorbed. The alcohol will evaporate quickly, leaving behind a pleasant acidity that balances the richness of the final dish.

Step 6: Add the Stock, Ladle by Ladle

This is the step that defines risotto. Add the warm stock one ladleful at a time, stirring frequently and waiting until each addition is almost completely absorbed before adding the next. This gradual process coaxes the starch from the rice, building the creamy consistency that characterises a great risotto. The entire process takes around 18 to 20 minutes over medium heat. Taste the rice as you go — it should be tender with just a slight bite at the centre when done.

Step 7: Finish and Serve

Remove the pan from heat. Stir in the vegan butter and nutritional yeast vigorously — this technique, called mantecatura in Italian cooking, is what gives risotto its final glossy, creamy texture. Fold in the reserved sautéed mushrooms. Taste and season generously with salt and pepper.

Serve immediately in warm bowls, finished with fresh parsley and a small drizzle of truffle oil if using.

Nutritional Highlights

Mushrooms are among the most nutritionally interesting ingredients in plant-based cooking. They are one of the few non-animal sources of vitamin D, particularly when exposed to sunlight — and shiitake mushrooms are a valuable source of B vitamins and zinc. Combined with the protein from nutritional yeast and the complex carbohydrates from the rice, this dish offers a balanced and genuinely nourishing meal.

Nutritional yeast deserves particular mention. Beyond its savoury, almost cheesy flavour, it is a complete protein and often fortified with vitamin B12 — a nutrient of particular importance for those following a fully plant-based diet. Two tablespoons provides a meaningful contribution to daily requirements.

Serving Suggestions

This risotto is complete as a standalone dish but pairs well with a simple green salad dressed with lemon and olive oil. A glass of the same dry white wine used in cooking is the natural accompaniment.

For a special occasion, shave thin slices of fresh black truffle over the top — it transforms the dish into something genuinely extraordinary. A small drizzle of good truffle oil achieves a similar effect at a fraction of the cost.

Make-Ahead Tips

Risotto is best served immediately, but if you are cooking for a dinner party and want to manage your time, you can cook the risotto to about 75 percent done — around 14 minutes of stock addition — and then spread it out on a baking tray to cool and halt the cooking. When ready to serve, reheat in the pan with an additional ladle or two of warm stock and finish as directed. This technique is widely used in restaurant kitchens and works extremely well.

Leftover risotto makes outstanding risotto cakes the following day. Form cold risotto into patties, coat lightly in breadcrumbs, and pan-fry in a little oil until golden on both sides. They are arguably even better than the original.

Final Thoughts

What this recipe ultimately asks of you is presence — a willingness to stand at the stove, stir, observe, and adjust. In an era of multitasking and distraction, there is something genuinely therapeutic about a dish that demands your full attention for twenty minutes. The risotto becomes better for your focus, and so, in some small way, do you.

Make it on a quiet evening when you have time to enjoy the process. It will reward you.


Explore more comforting plant-based recipes in our Website.

Creamy Chickpea Tikka Masala: A Plant-Based Twist on a Beloved Classic

There are some dishes that feel like a warm embrace — the kind of meal that makes you slow down, take a breath, and remember that cooking can be one of the most grounding things a person does. Tikka masala is one of those dishes for me. Rich, fragrant, deeply spiced, and finished with a sauce that you will want to mop up with everything in reach, it has long been a favourite in households across the world.

This version swaps the traditional chicken for chickpeas — not as a compromise, but as a genuine upgrade. Chickpeas carry spice beautifully. They have a natural earthiness that pairs wonderfully with the tomato-based sauce, and their firm texture means they hold up through the simmering process without turning to mush. The result is a bowl of food that is satisfying in every sense of the word.

What I love most about this recipe is that it is genuinely achievable on a weeknight. If you keep a few key spices in your pantry and most home cooks do the shopping list is short and the active cooking time is under forty minutes. Yet the flavour suggests something far more laboured. That is the beauty of spices used well.

Understanding the Flavour Base

Before we get into the recipe itself, it is worth talking briefly about what makes a tikka masala sauce taste the way it does because understanding the flavour logic makes you a better cook, not just a better recipe-follower.

The foundation is a deeply cooked onion and tomato base. When you take the time to cook the onions low and slow until they are genuinely golden not merely translucent you develop a natural sweetness and depth that no amount of seasoning can replicate. This step is the most important in the recipe, and it is also the one most people rush. Give it time.

From there, the spice blend does the work. Cumin, coriander, garam masala, turmeric, and smoked paprika come together to create that unmistakable warmth. A generous amount of ginger and garlic rounds out the aromatics. The final touch a swirl of coconut cream softens the edges of the sauce and gives it that distinctive, velvety finish.

Ingredients (Serves 4)

  • 2 cans (800g) chickpeas, drained and rinsed
  • 1 can (400g) chopped tomatoes
  • 1 can (400ml) coconut cream
  • 2 medium onions, finely diced
  • 6 garlic cloves, minced
  • 2 tablespoons fresh ginger, grated
  • 3 tablespoons tomato paste
  • 2 tablespoons neutral oil (such as sunflower or coconut)
  • 1½ teaspoons cumin seeds
  • 1½ teaspoons ground coriander
  • 1 teaspoon turmeric
  • 1 teaspoon smoked paprika
  • 1½ teaspoons garam masala
  • 1 teaspoon chilli powder (adjust to taste)
  • 1½ teaspoons salt, or to taste
  • 1 teaspoon sugar (optional, to balance acidity)
  • Fresh coriander, to serve
  • Basmati rice or naan bread, to serve

Method

Step 1: Build the Base

Heat the oil in a wide, heavy-bottomed pan over medium heat. Add the cumin seeds and let them sizzle for about thirty seconds — you will know they are ready when they begin to pop and release their aroma. Add the diced onions and a pinch of salt. Cook over medium-low heat for 12 to 15 minutes, stirring occasionally, until the onions are deeply golden and beginning to caramelise. This patience is rewarded later in the depth of the sauce.

Step 2: Add Aromatics and Spices

Stir in the garlic and ginger and cook for two minutes. Add the tomato paste and cook for another two minutes, stirring constantly — this brief caramelisation of the paste removes its raw edge and adds another layer of flavour. Now add the ground coriander, turmeric, smoked paprika, and chilli powder. Stir everything together and cook for one minute, letting the spices bloom in the residual oil.

Step 3: Build the Sauce

Pour in the chopped tomatoes and stir well, scraping any caramelised bits from the bottom of the pan. Simmer for 10 minutes, allowing the tomatoes to break down and the sauce to reduce. If you prefer a smoother sauce, use an immersion blender at this point to partially blend it — leaving some texture is perfectly fine too.

Step 4: Add the Chickpeas and Coconut Cream

Add the drained chickpeas and stir to coat them in the sauce. Pour in the coconut cream, reduce the heat to low, and simmer gently for 15 minutes. The sauce will thicken and deepen in colour. Add the garam masala and taste for salt. If the sauce tastes sharp or overly acidic, a small pinch of sugar will balance it beautifully.

Step 5: Rest and Serve

Remove from heat and allow the dish to rest for five minutes before serving. This brief resting time allows the flavours to settle. Serve over fluffy basmati rice or alongside warm naan bread, and finish with a generous handful of fresh coriander.

Why This Works for the Whole Family

One of the most common hesitations around plant-based cooking is the question of whether it will satisfy everyone at the table — particularly those who are accustomed to meat-centred meals. This tikka masala addresses that concern directly. Chickpeas are a meaningful source of plant-based protein and dietary fibre, which means this dish is genuinely filling rather than a lighter, compromise version of something else.

Each serving provides approximately 18 grams of protein from the chickpeas alone, alongside iron, folate, and complex carbohydrates from the legumes. The coconut cream contributes healthy fats that support nutrient absorption from the spices — particularly the curcumin in turmeric, which requires fat to be properly absorbed by the body.

Customising the Recipe

This recipe is forgiving and highly adaptable. Here are a few variations worth exploring:

Add vegetables: Spinach, diced sweet potato, or cauliflower florets all work beautifully in this sauce. Add firmer vegetables at the same time as the chickpeas, and stir spinach in during the last two minutes of cooking.

Adjust the heat: The chilli powder quantity in this recipe creates a mild-to-medium heat. Increase it for a spicier result, or replace it entirely with a sweet paprika for a family-friendly version that still has full flavour.

Storing and Reheating.

Store leftovers in an airtight container in the refrigerator for up to four days. The sauce thickens considerably once chilled, so add a small splash of water when reheating. It also freezes exceptionally well — portion it into freezer-safe containers and freeze for up to three months. Defrost overnight in the refrigerator before reheating gently on the stovetop.

A Dish That Brings People Together

Use canned coconut milk instead of cream: Coconut milk will produce a lighter, thinner sauce. Both work well — the choice depends on how rich you want the final dish to be.

Make it ahead: Tikka masala is one of those dishes that genuinely improves overnight. The spices continue to develop, the sauce thickens slightly, and the chickpeas absorb more of the surrounding flavour. Make a double batch and refrigerate for up to four days.

There is something quietly special about a recipe that crosses dietary lines so gracefully. Guests who eat meat rarely notice the absence of it in this dish. What they notice instead is the sauce — its depth, its warmth, its balance. That is the mark of good cooking regardless of what is or is not in the pot.

This chickpea tikka masala has found its way onto my table more times than I can count, and it has become the kind of recipe I return to not because I have to, but because I genuinely want to. I hope it does the same for you.

Serve it to someone you love, or simply make it for yourself on a Tuesday evening when you need something that tastes like effort but takes very little of it. Either way, it will not disappoint.


Looking for more plant-based dinner ideas? Explore our full collection of vegan recipes in the Health & Lifestyle section.